How to Build a Modern Coffee Table from Scratch
Editor's Note: This project is an excerpt from the new book The Art and Craft of Wood: A Practical Guide to Harvesting, Choosing, Reclaiming, Preparing, Crafting, and Building with Raw Wood by Silas J Kyler and David Hildren. The book is available now at your favorite local bookstore, Powell's, or Amazon. Thanks to Quarry Books for sharing this project with us.
Building furniture is what first drew me to woodworking. The first coffee table I ever made was for my mom. It was a surprise gift, and I worked tirelessly, hour upon hour, to create something I was proud of. I remember the unveiling well, and the joy it gave her was well worth all the hard work.
The projects to this point have been small and technically much easier than building a piece of fine furniture. Going from making a serving tray or lamp to a coffee table may feel like a big step, and in many ways it is, but practicing with small projects gives you all the skills you need to approach a simple piece of furniture. Remember: with a good dose of patience, you will be well on your way to creating beautiful furniture.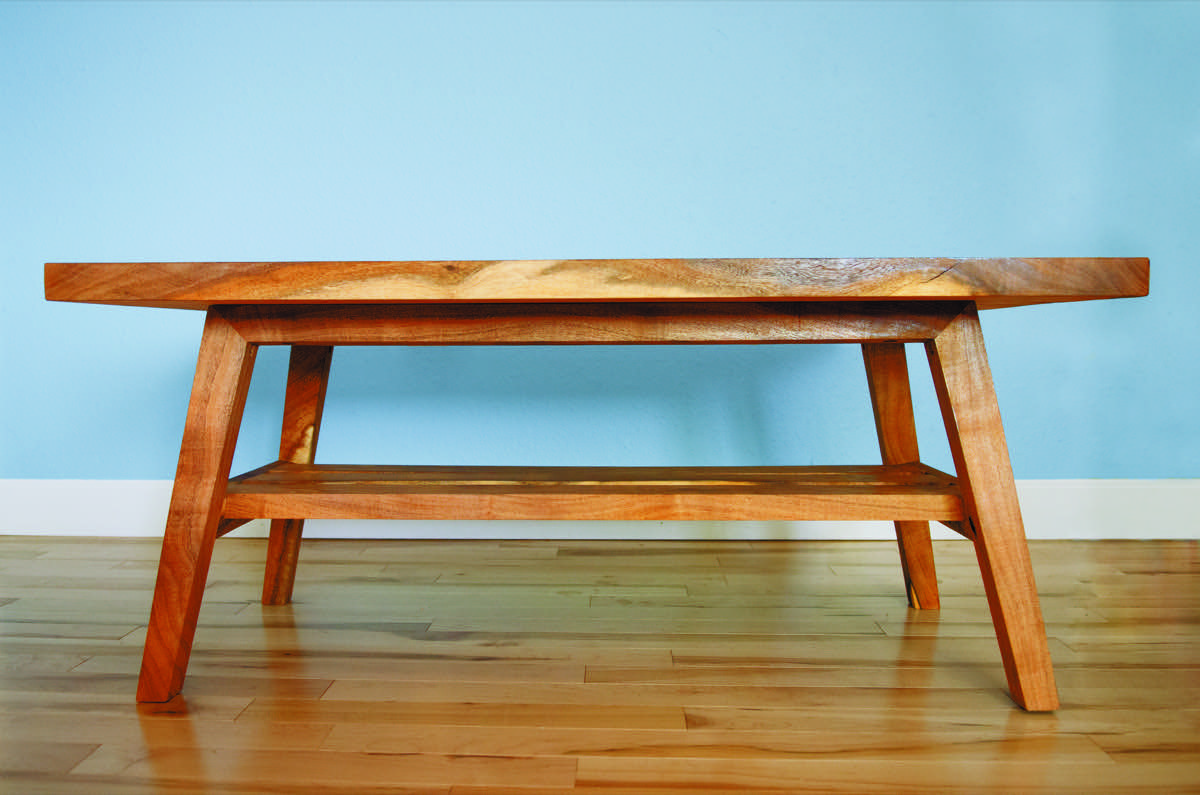
I had a particular set of mesquite slabs in mind when envisioning this coffee table. The tree came from my neighbor’s front yard. When it was removed, they simply asked the crew to leave the trunk behind for me to gather. As I was giving this tree a new life, I could step outside my shop, look across the alley, and see where it lived and died. I could also see where the logs sat and seasoned for two years, driving my wife crazy.
Tools and Materials
- 4 or 5 seasoned wood slabs, approximately 18″ wide, 48″ long, and 1 1/2 to 2″ (4 to 5 cm) thick (MM note: you could also buy less wide boards from a lumber yard, and glue up the pieces as necessary)
- Wood glue
- Sandpaper (80, 120, and 220)
- Finish (tung oil, polyurethane, or similar)
- Router and router table
- Flat bottom router bit
- Flattening jig for router
- Thickness planer
- Miter saw
- Circular saw with straightedge
- Fine-tooth pull saw
- Chisels
- Hand drill
- Clamps
- Handheld belt sander
- Random orbit sander
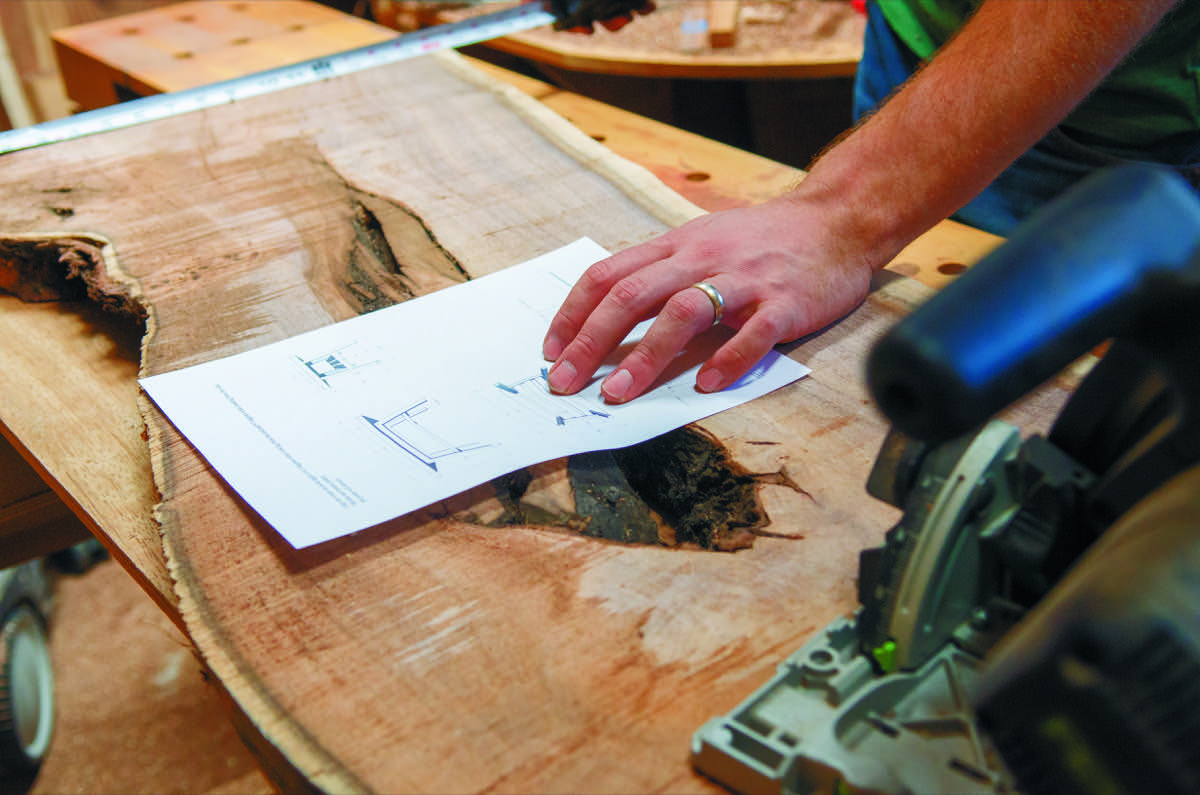
Step 1: Make a plan
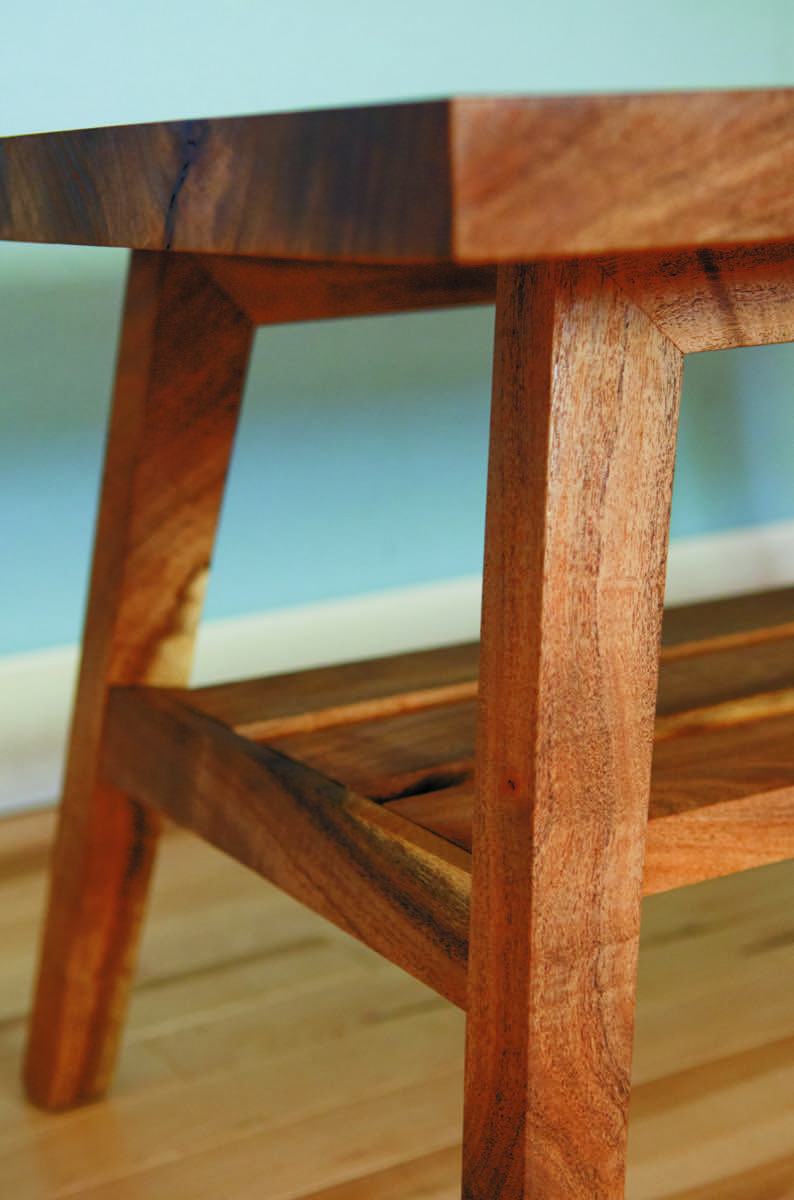
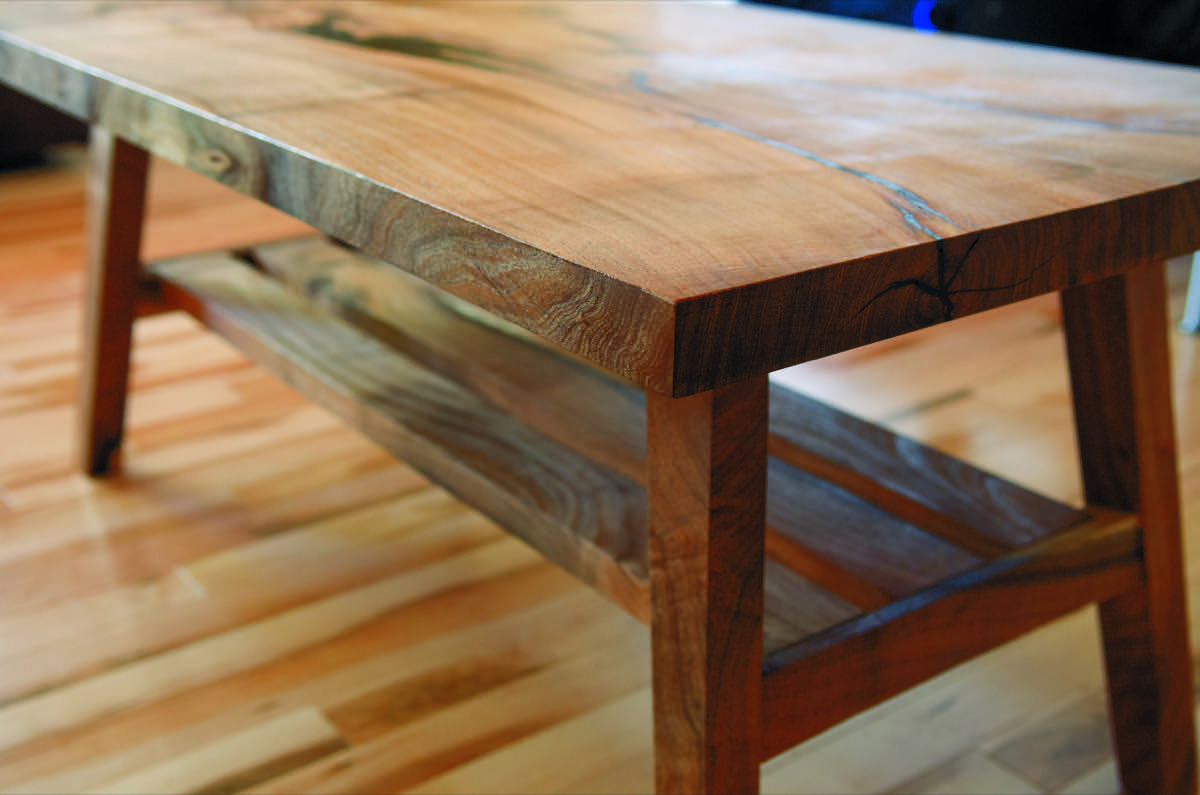
Having a plan when building a piece of furniture is essential. The plan for this mid-century influenced coffee table is fairly basic: a top, four legs, and a shelf. The curveball here is that the legs are set at an angle rather than being straight up and down. It’s easy to come up with a concept in your head, but the details of each joint, the angle you need to cut each piece, and a multitude of other details are precisely why it’s so important to have plans. Once the plans have been created, keep them handy in the shop and refer to them frequently. This isn’t to say that I always adhere strictly to the plan. As the build progresses, you may need to adapt due to material constraints or unforeseen issues. Make simple notes on the design of any changes as you go and move along. Our plans were for a table 24 inches (61 cm) wide, 42 inches (106.5 cm) long, and 18 inches (45.5 cm) high.
Step 2: Prepare the raw wood
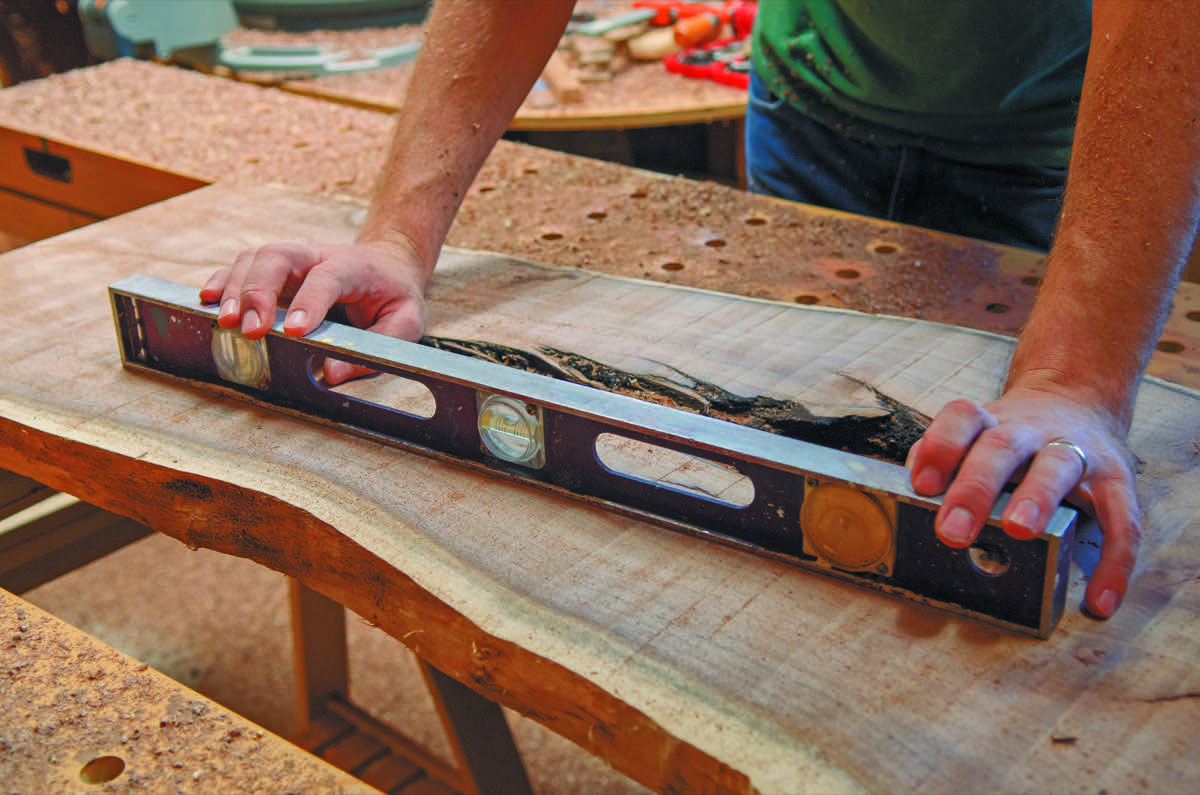
The steps to preparing your raw wood are no different than for smaller projects, just larger. The slabs you’ll be working with need to be relatively flat. Flattening multiple larger pieces of raw wood by hand will have you questioning our choice in hobbies. Use this trick for flattening slabs. Create a sled for your plunge router that rests upon flat boards on both sides of the slab. The result is a track of sorts that allows your router, equipped with a wide, flat bottomed bit, to glide back and forth across the slab as you push the sled from one end to the other. Perpendicular side guides keep the router under control as you make pass after pass. Depending on the amount of warping present, you may have to do two passes: one for the highest spots and another to equalize the whole surface. Remember that multiple passes removing smaller amounts of material are better than single deep passes.
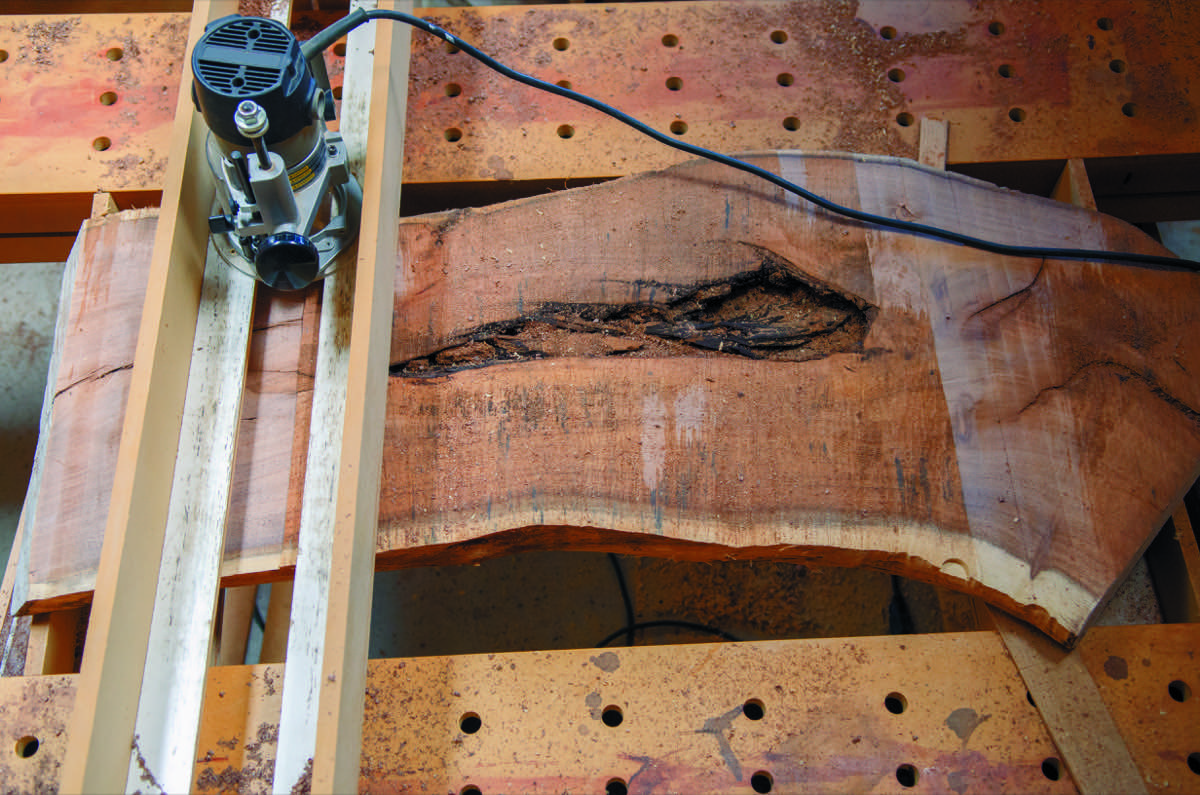
Once one side is flat, flip the slab over and repeat on the other side. Make sure that when you set your slab in place, you average out any twists by shimming opposite corners equal amounts, minimizing the material you need to remove. If your planer is large enough, trim the slabs and send them through the thickness planer, using the side you just flattened as your flat-reference. Remember, you have to have one side flat for a thickness planer to get a
board square.
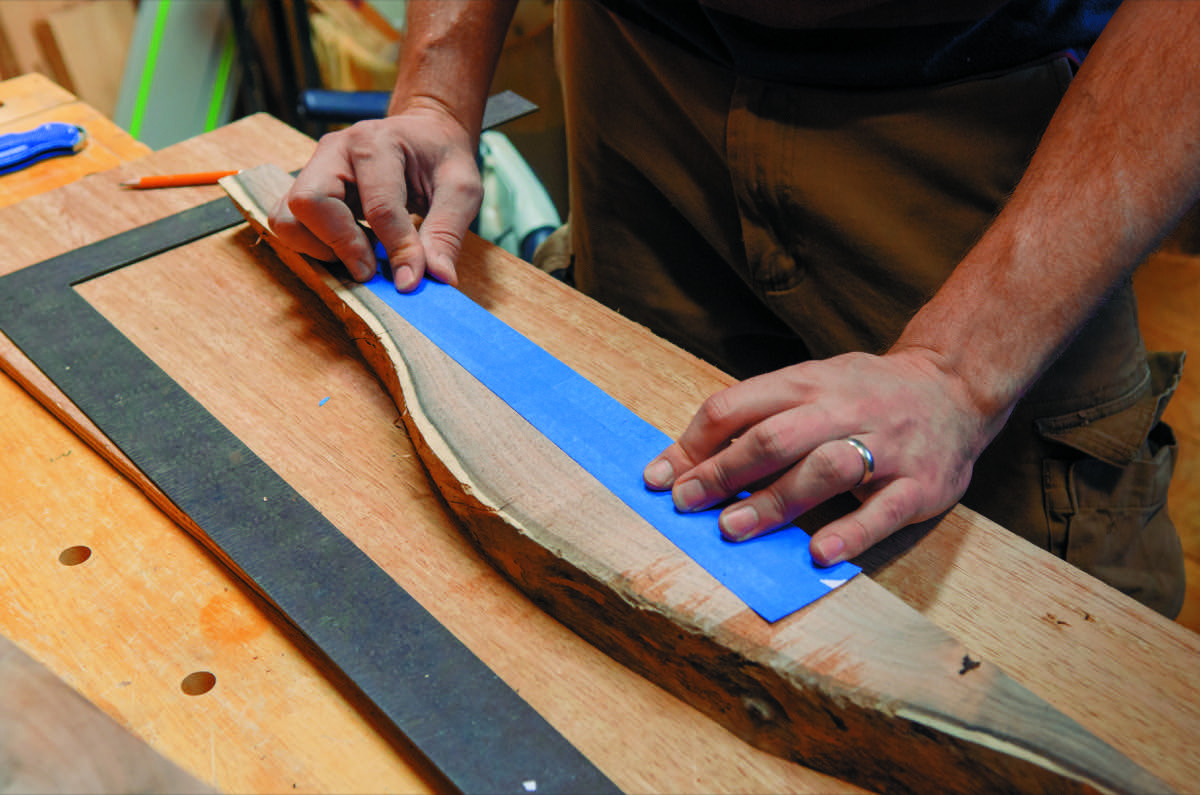
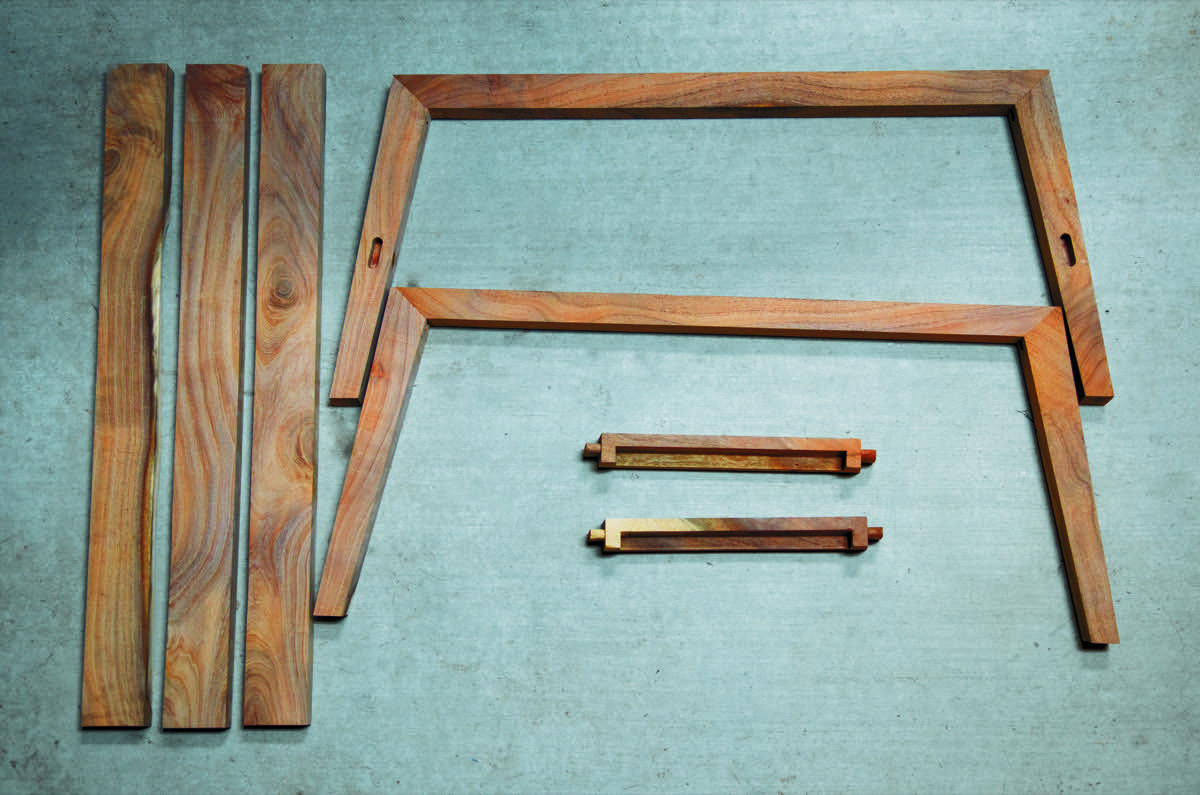
Step 3: Cut rough pieces
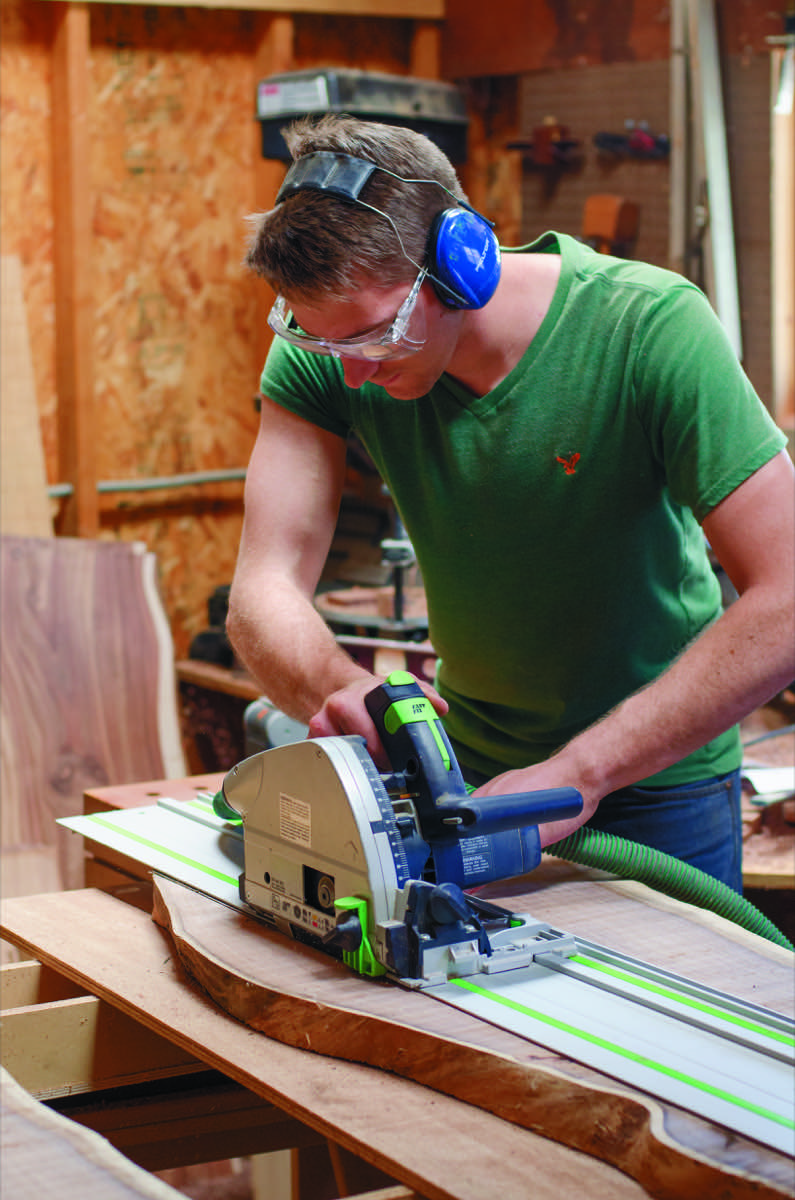
Choose the two best pieces for the tabletop and the rest for the base. The pieces that make up the base will need to have some structural strength, so cut around major defects. Use a paper template to mark each leg and avoid those problem areas. Use a circular saw with a straight edge to make these straight cuts that aren’t parallel to the edge of the board. A bandsaw could be used here, but the cut will need more sanding later on to smooth all the
saw marks.
The pieces making up the legs and base of the table have very specific angles that they need cut at so everything fits together nicely at the end. Use a miter saw for this, carefully reviewing every cut with your plans. This table has legs that splay out in both directions: 9.5 degrees toward the end and 6.5 degrees to the side. The top of the legs are cut at a 35.5 degree angle and 45 degrees on the upper support.
When rough trimming the slabs for the top, leave plenty of extra space to allow for some flexibility later when
it is time finish the table. It’s best to leave those decisions till later, after you can see the table coming together and visualize the proportions of the top next to the base.
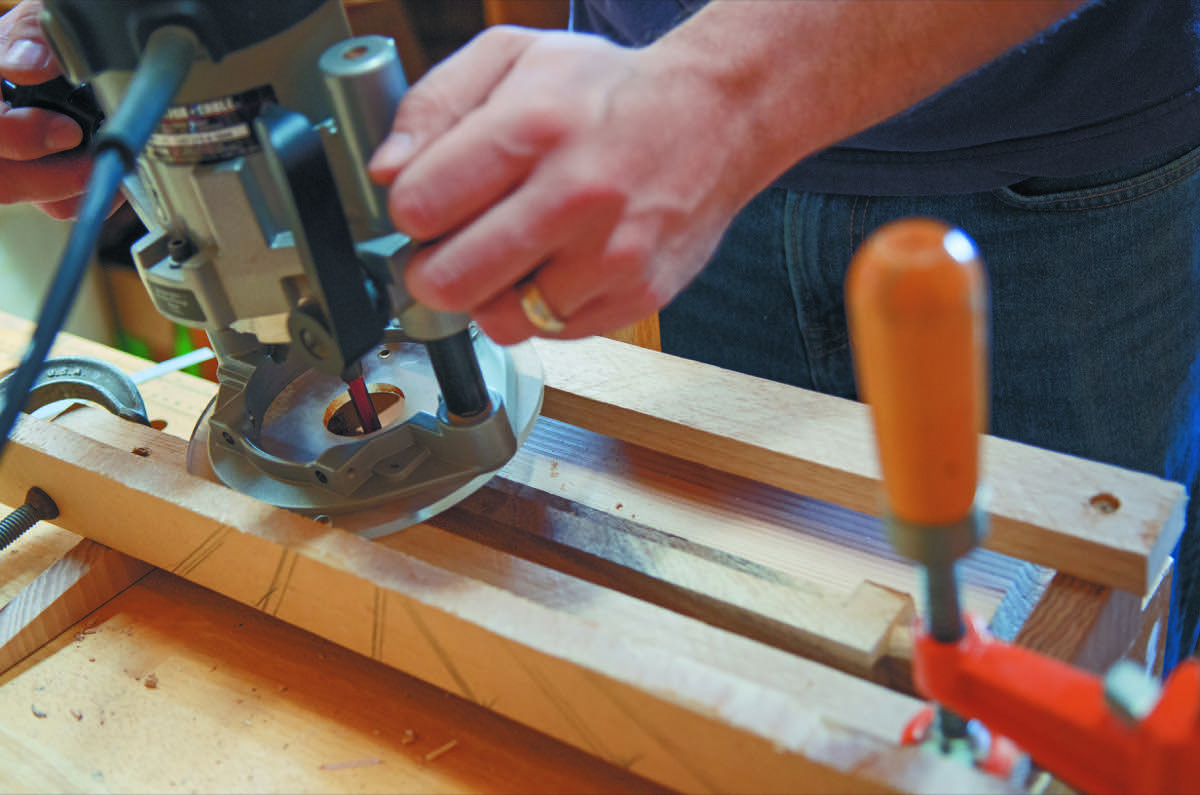
Step 4: Joinery
In this table, the cross supports on either end have traditional mortise and tenons. The mortise is a hollow, and the tenon is a matching protrusion which, when fit together, form a strong joint—even without gluing . When fit together, they form a very strong joint, even without gluing. Where the legs meet the long upper supports, an interlocking miter joint is used.
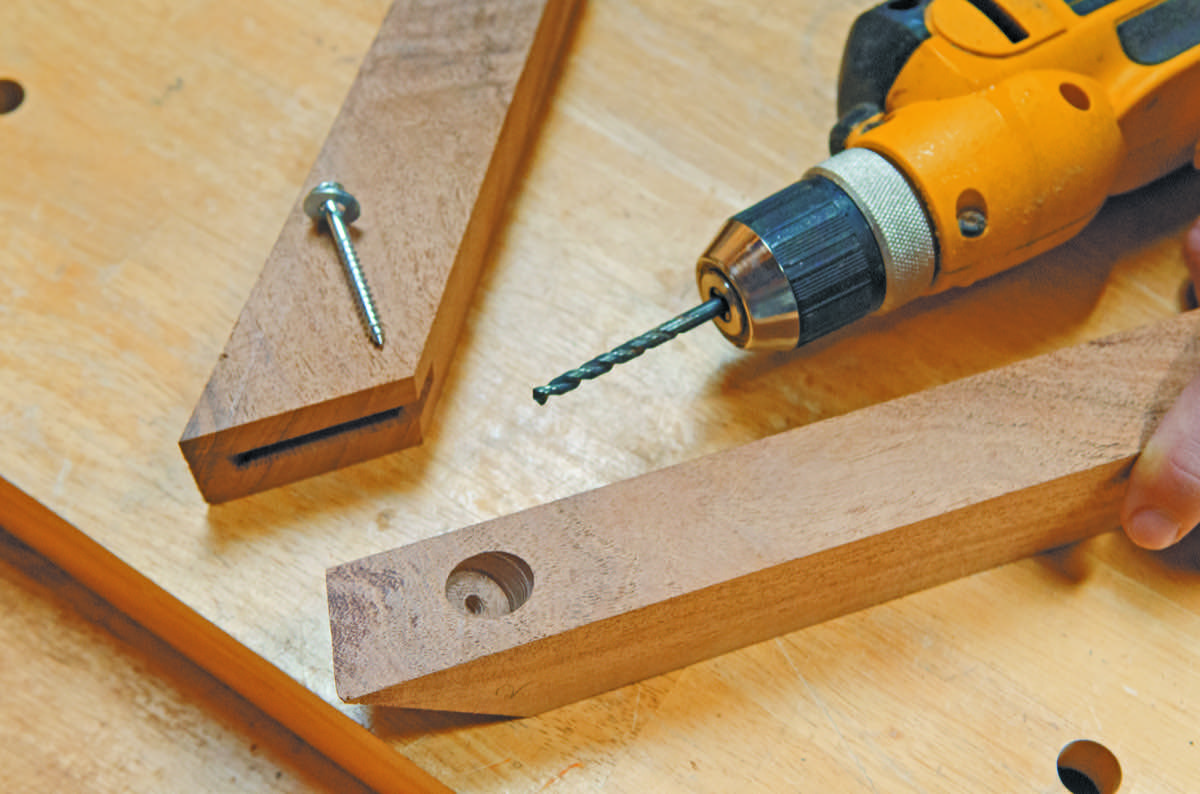
Because the miter joint isn’t always very strong, and in this case is such a critical structural point in the table, some large screws add an extra layer of strength. When reinforcing with screws, drill a larger relief hole to hide the head of the screw. This is what’s known as countersinking.
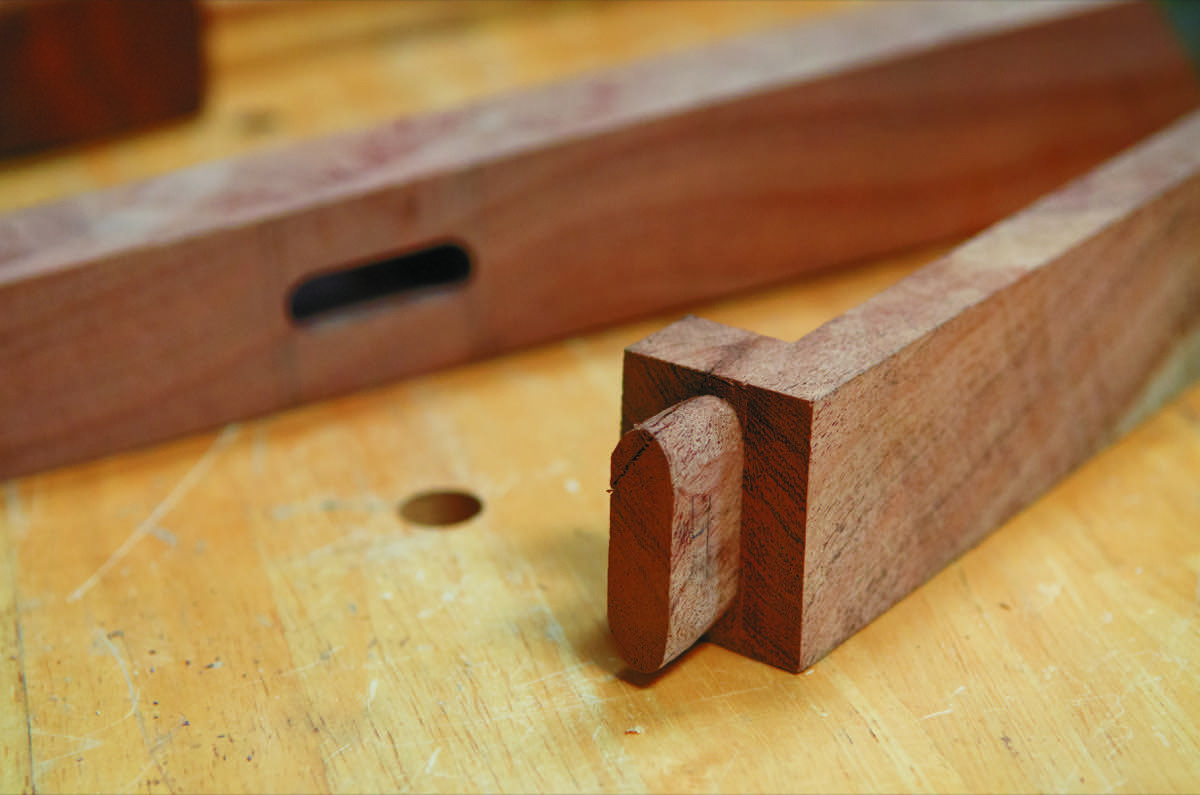
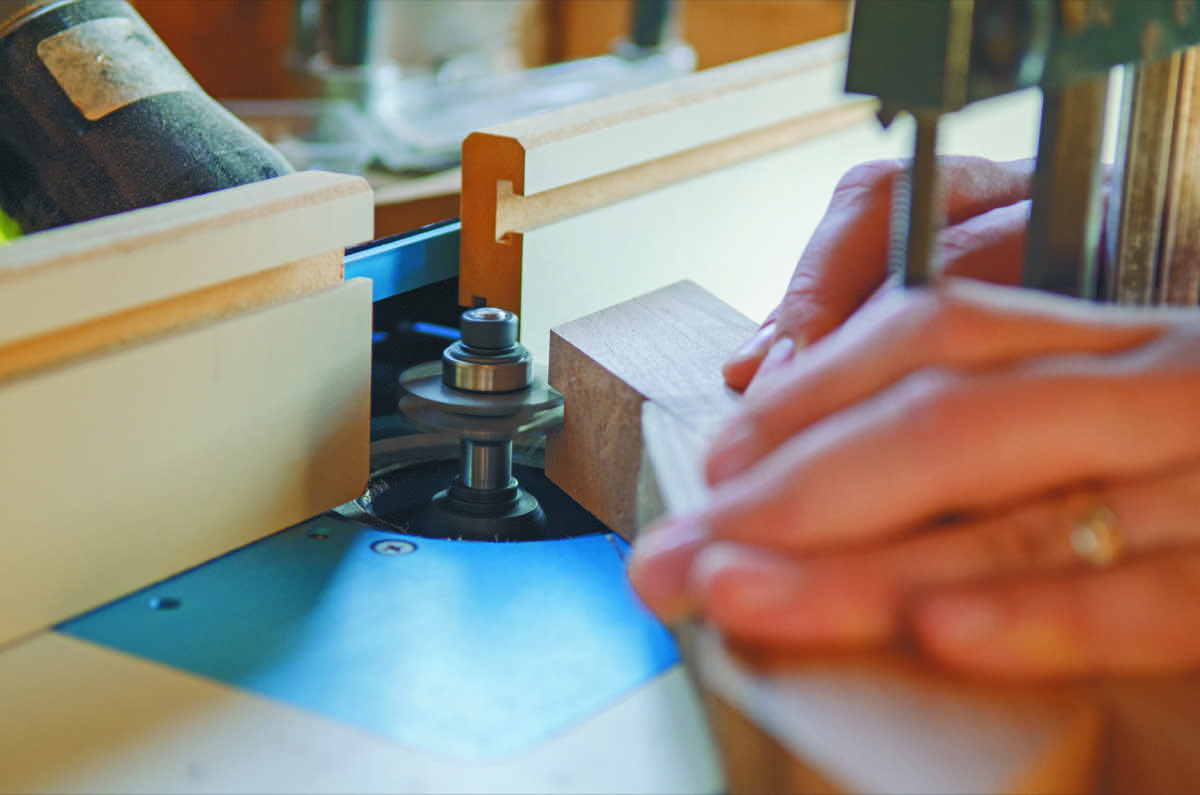
Make the mortise and tenons with a router and a straight cut bit. Use the plunge router to create the hollow for the mortise and the router on a table to cut the tenons. Traditionally, this joint has square edges, but since the router naturally creates a hole with rounded corners, it can be easier to round the tenons than to square the mortises. You can use a handsaw and chisel to create this joint if you don’t have a router.
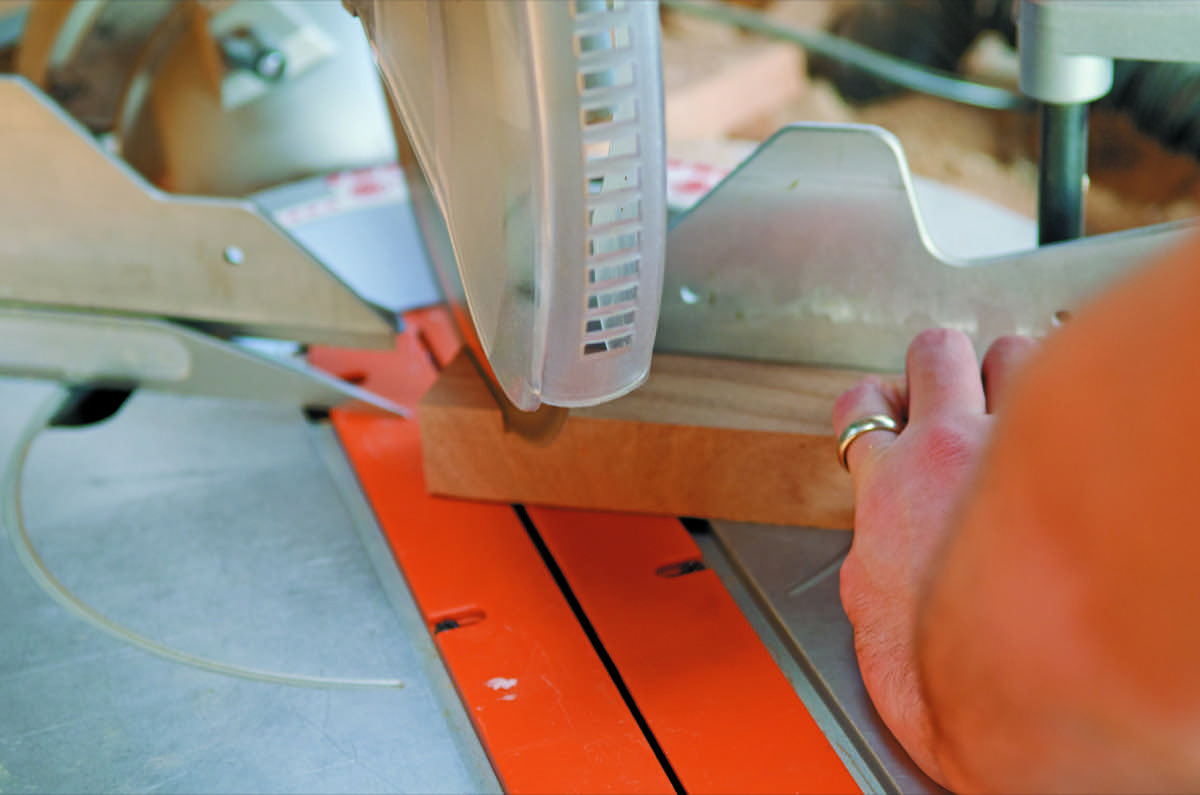
The legs of this table are angled out slightly not only toward the end of the table but also toward the side, which creates compound miters. Every time a joint is cut, careful attention needs to be given to cut at the appropriate angle. Thankfully, a miter saw makes this much more practical than if cutting by hand.
The other major joint in this table is where the shelf pieces meet the cross support. The inside edge of each cross support has a supporting ledge so the shelf pieces can rest flush with the support. Later, these will be glued and pinned into place with dowels drilled in from the bottom. This will provide decent lateral support, which is the structural function of the shelf. Having a long support piece running the length of the table midway down the legs keeps everything more stable when kids are pushing on it, adults are sitting on it, and during all manner of abuse that a coffee table receives.
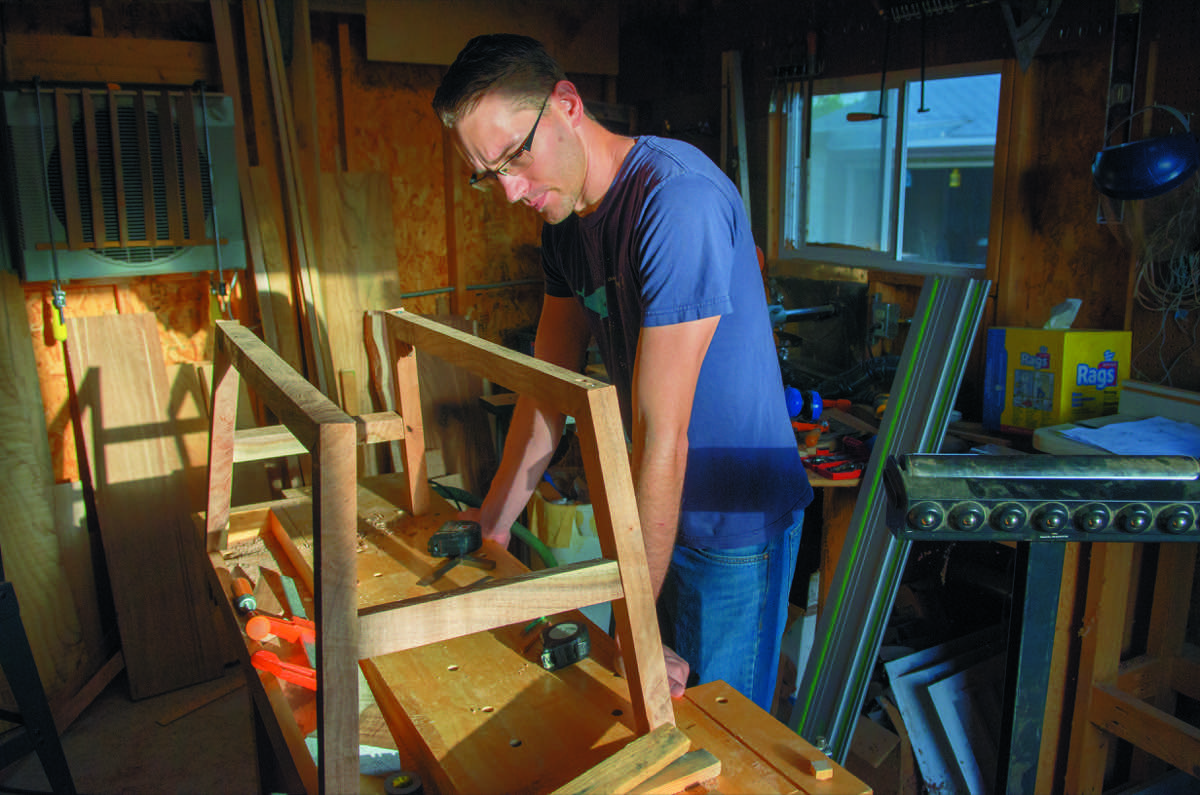
Step 5: Dry fit
Before permanently gluing anything, make sure you do a dry fit, piecing everything together without adhesive. This dry fit will tell you if you’ve made any inadvertent errors or if you need to fine tune any of your joints. Plus, it’s just great to be able to see the progress you’ve made. Identify each piece with a light pencil mark, to keep track of where each goes and to make sure you don’t make some irreversible error later.
A very important part of the rough fit is to plan for how you will clamp the pieces up when gluing. It’s a bad idea to start gluing without having any notion of where to place your clamps. Time suddenly moves faster when you start gluing, and before you know it, you’ll have spent all your time fiddling with clamps and your glue will be set before everything is put together.
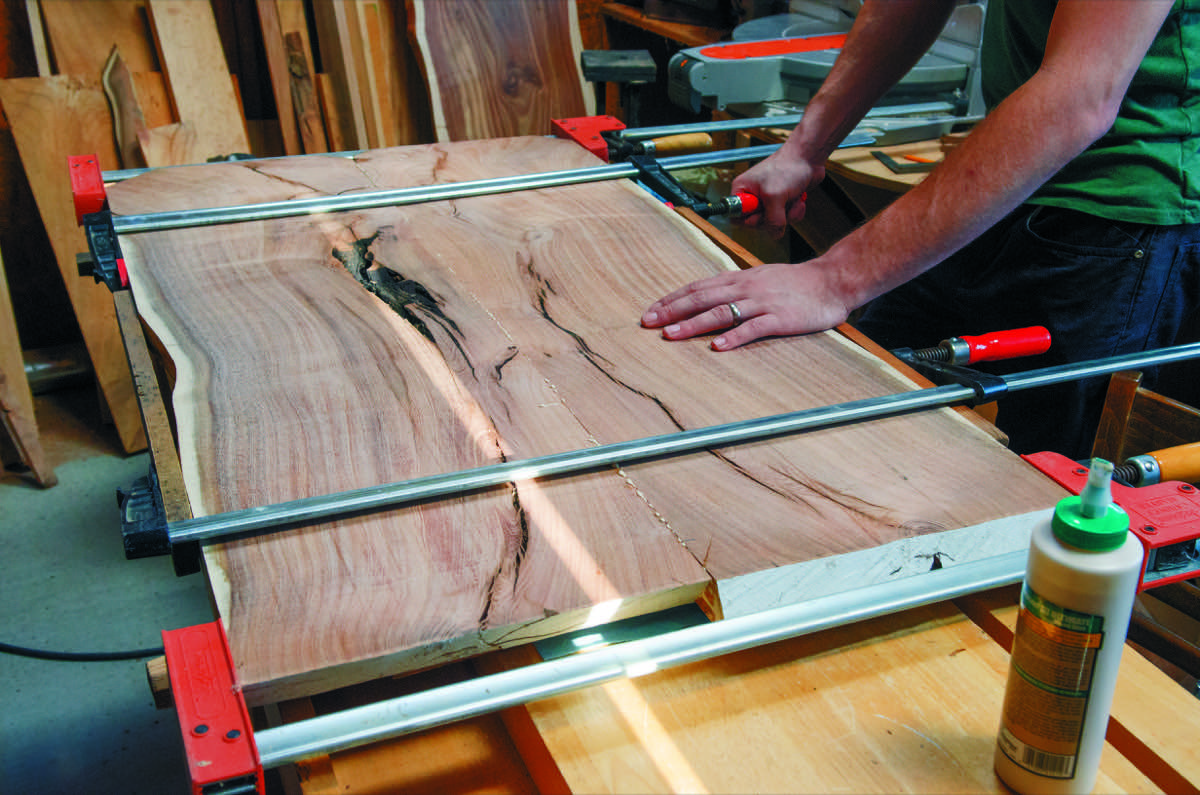
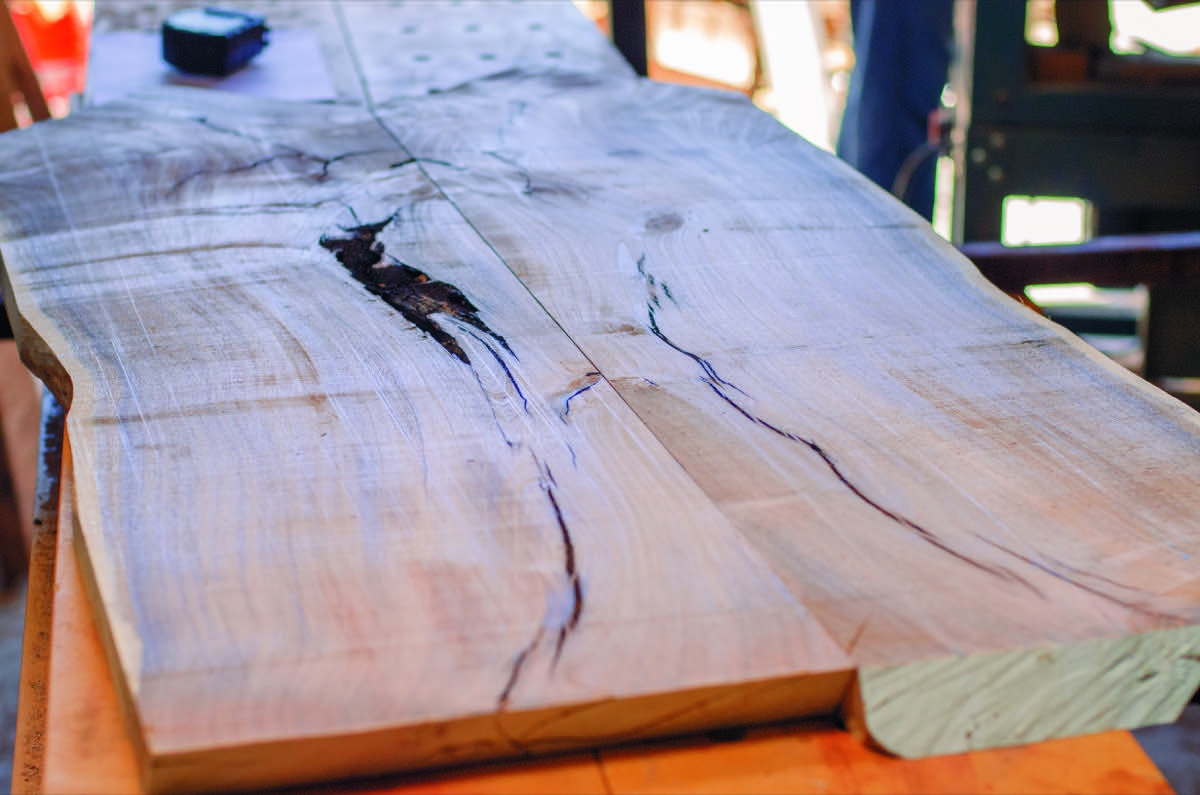
Step 6: Join the tabletop pieces
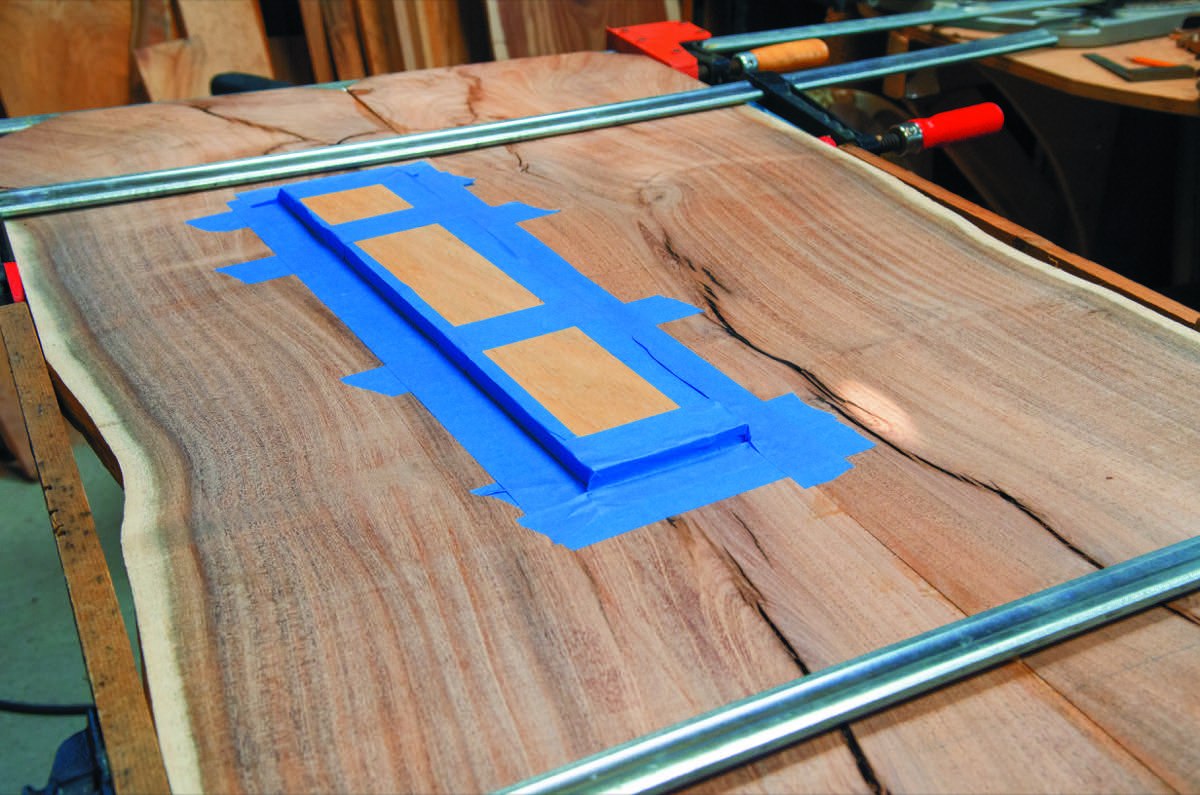
Make sure the two pieces have straight and square edges so the joint will be nice and tight. Use a biscuit joiner to give some extra strength and to keep the two pieces aligned when clamping together. Or cut a channel down the center of both slabs using a router bit and cut splines to fit as shown here. Make sure that you don’t cut the groove anywhere near the end of the slabs, especially if you plan on trimming more later, or else you could end up with a hole in the end of your tabletop.
Make some marks where the two pieces should meet or find a landmark to serve as your matching point and apply your glue. Remember to alternate clamps up and down to evenly distribute the clamp’s force and to keep everything nice and flat.
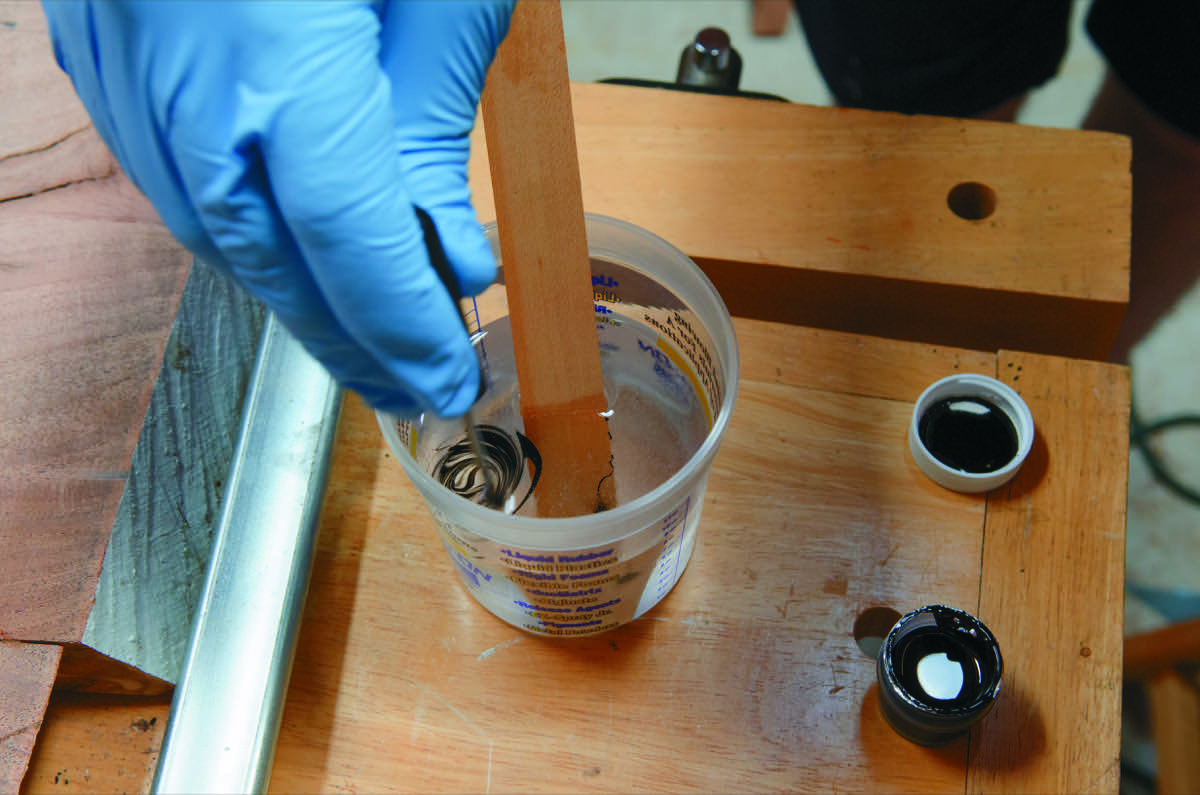
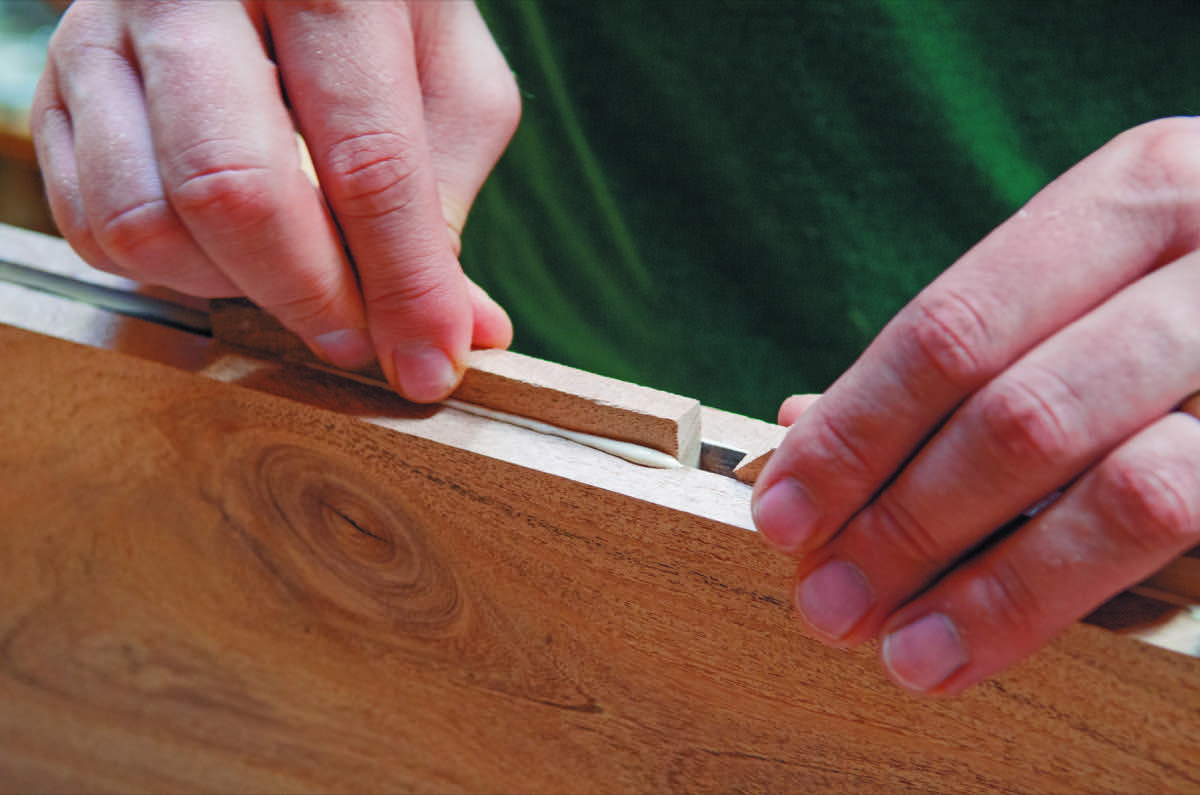
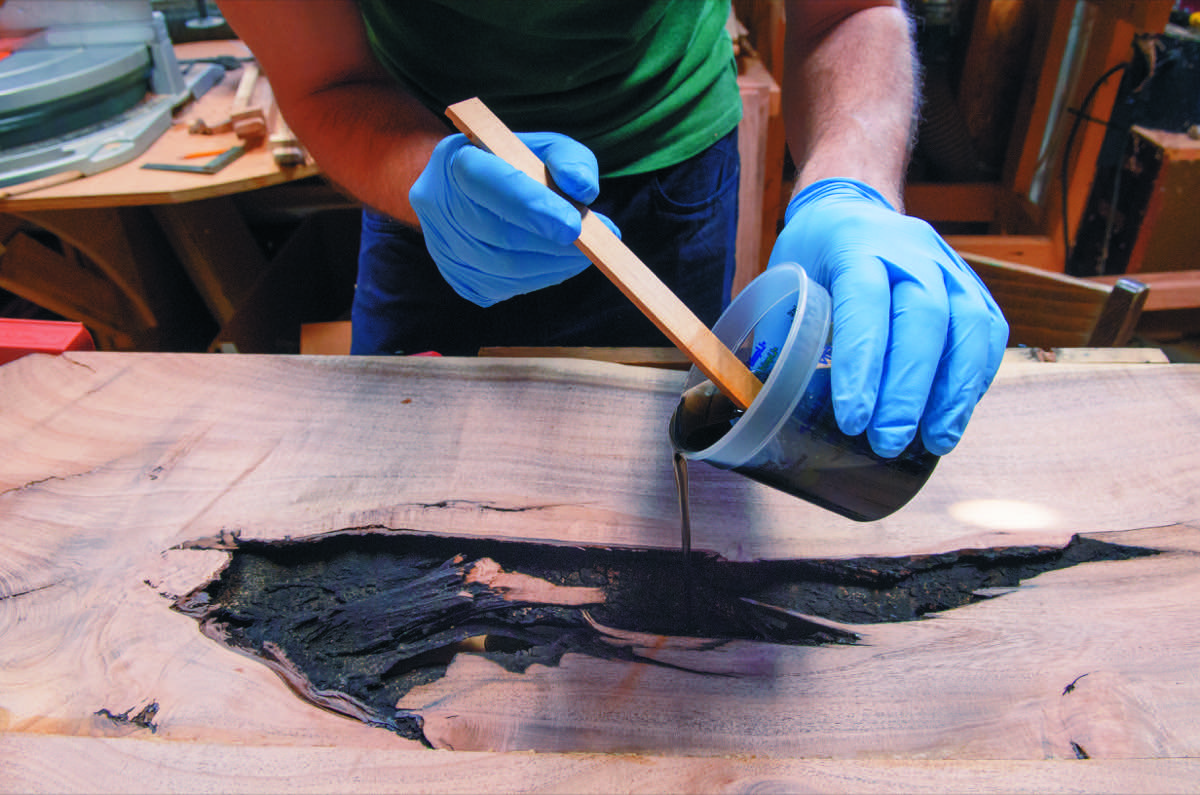
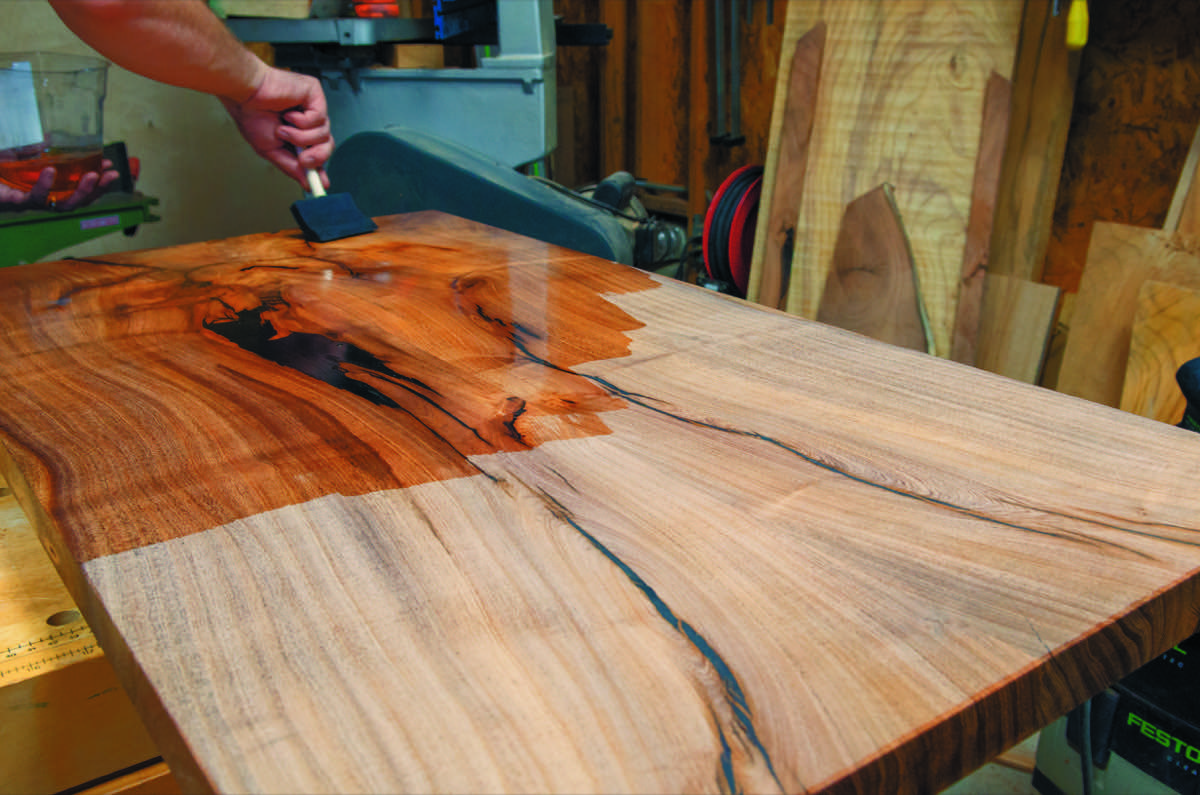
Step 7: Fill Voids
This step will only be necessary if your wood has voids. Mesquite is full of odd holes, dark cracks, and other anomalies, so there are plenty of places that need filling on the table top. For the base, there should not be anything to fill since defects were avoided for structural integrity. The epoxy is tinted here to match the look of the wood.
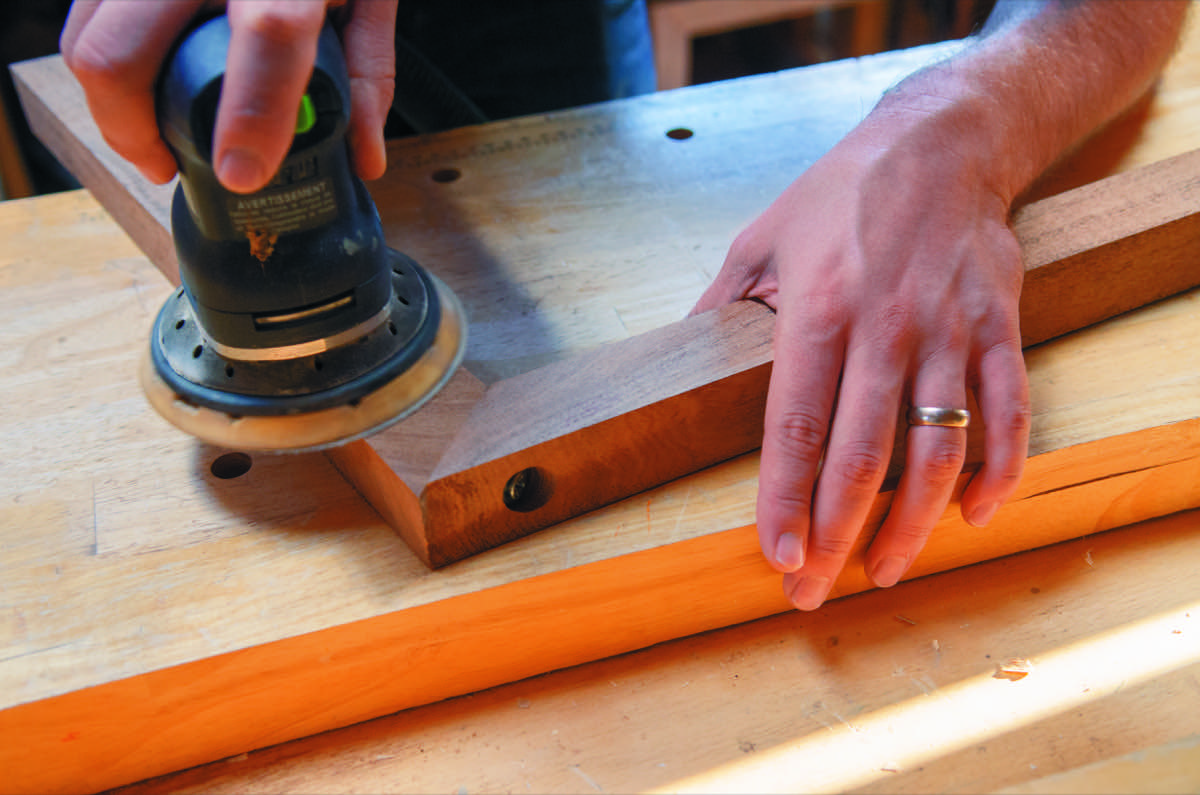
Step 8: Initial Sanding
Sanding before you glue the base together will greatly improve the aesthetic quality of your final furniture. The idea is to take individual pieces and sand them before the final project has been assembled, reducing the number of hidden and impossible to reach places you’ll have to sand. There’s no way you can sand little nooks and crannies well, and more often than not, you’ll end up scratching the surface of an adjacent piece. Since the miter joints between the legs and top supports are supposed to be flush, I treated those assemblies as a single piece and sanded after they were glued up. At the end of the initial sanding, you should have a nice tidy group of components, ready
for assembly.
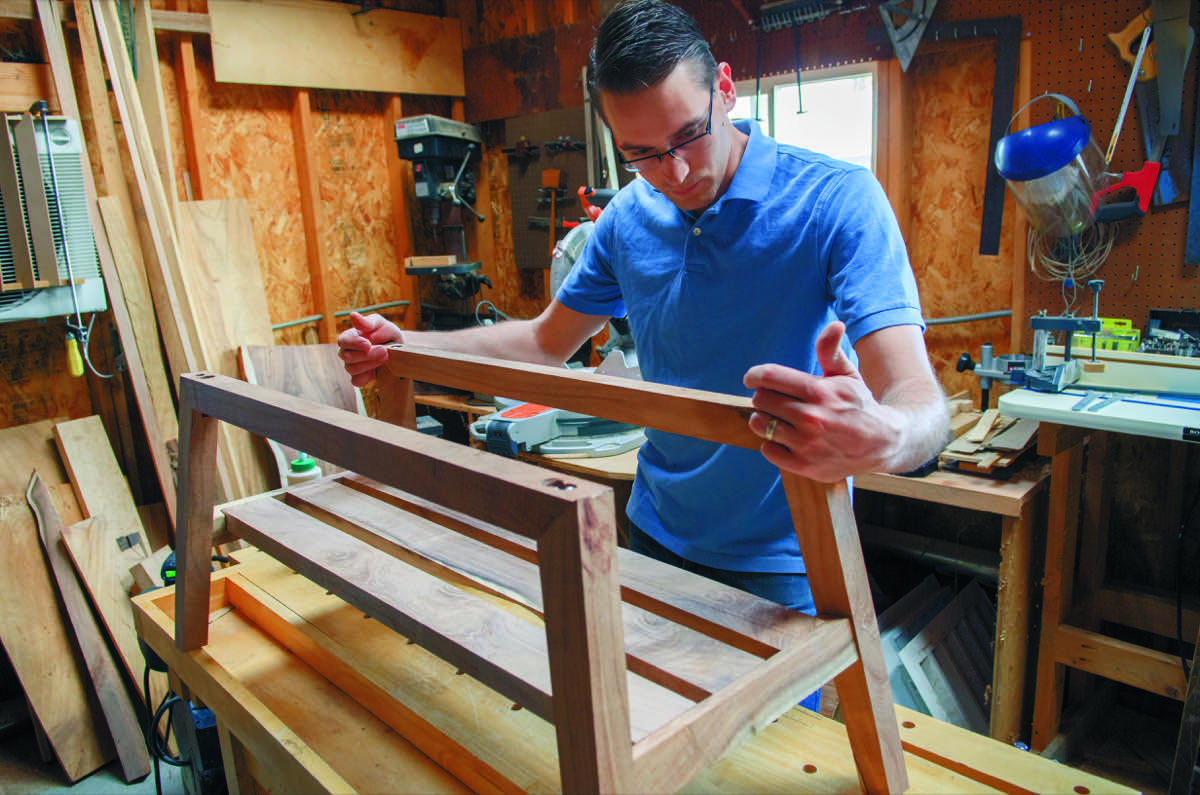
Step 9: Glue and Assemble
Drill countersunk screw holes from the top of the cross supports into the legs. Apply glue to the miter joints of the legs and screw together.
Use a small brush to apply glue to the inside of the mortises and the surfaces of the tenons. Assemble the legs and crosspieces and clamp in place. Use scrap wood to protect the legs from clamp indentations.
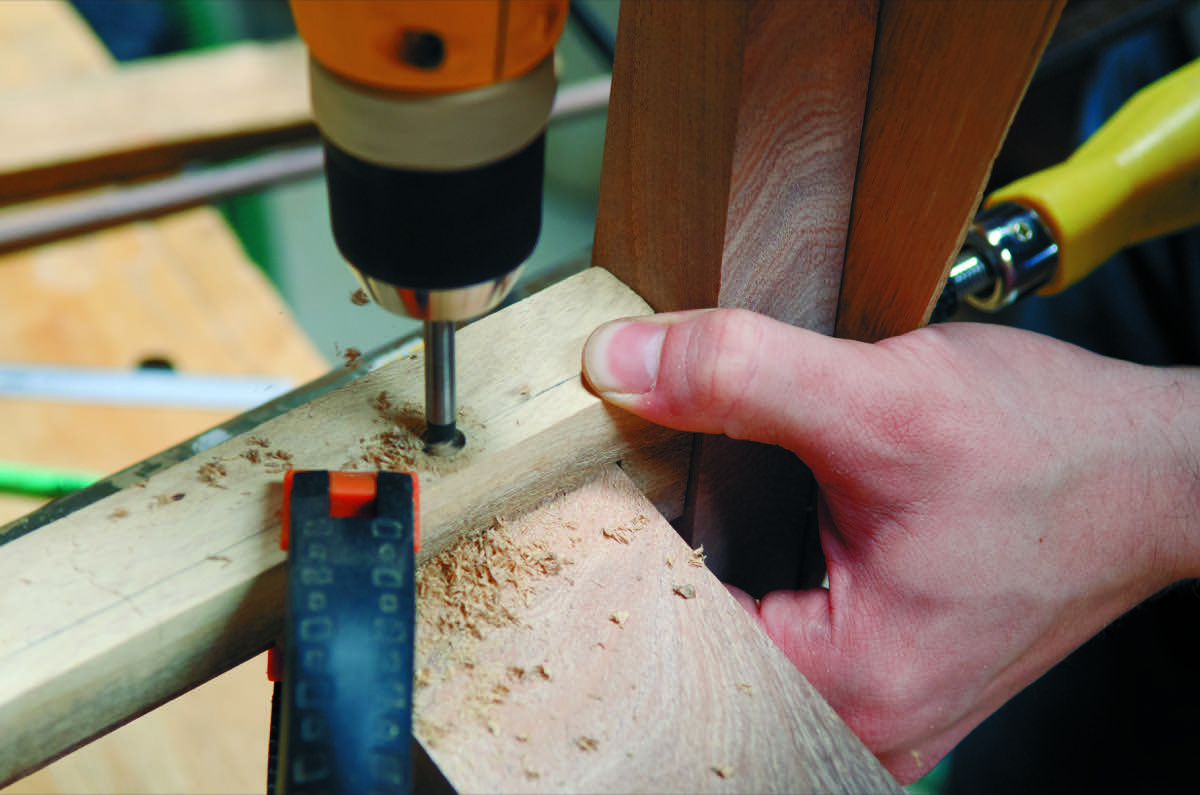
The last piece to glue involves a dowel joint, securing the shelf slats to the cross-supports. Drill the dowel joints last because things have shifted a small amount from the dry fit, and even a miniscule change makes it next to impossible to drive that dowel into place. Drill the dowel holes from the underside of the crosspiece into the shelf slats. Mark the drill bit for the correct depth so you do not drill through the shelf. Apply glue to the dowels and assemble.
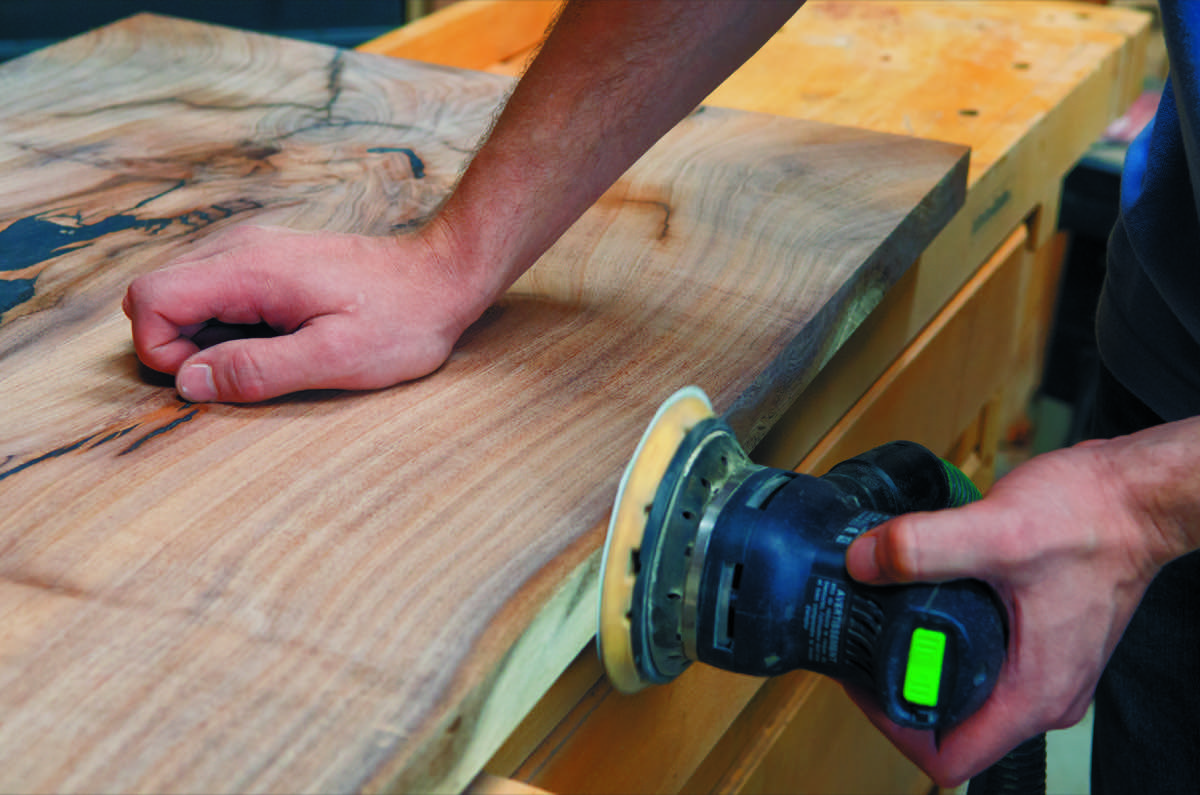
Step 10: Final sanding
After all the epoxy has cured on the tabletop, the final sanding step begins. Touch up any spots that need attention on the base, and if you hadn’t already in the first sanding step, round the corners over a bit. Sand the table top, beginning with a handheld belt sander to remove material quickly. Once the rougher sanding has been done, any final trimming necessary can be done on the tabletop followed by the fine sanding with the orbital sander.
Sanding a table top is a time-consuming task, but as tedious as sanding is, the time and attention in this step will make itself apparent in the finished piece.
Step 11: Finish Base and Top
Before connecting the tabletop to the base, apply the finish. To bring out the contrast in the wood, two coats of dewaxed shellac were applied before finishing with a polyurethane on the table top to protect against moisture. Polyurethane is more resilient than oil, so for table tops, it is a good choice.
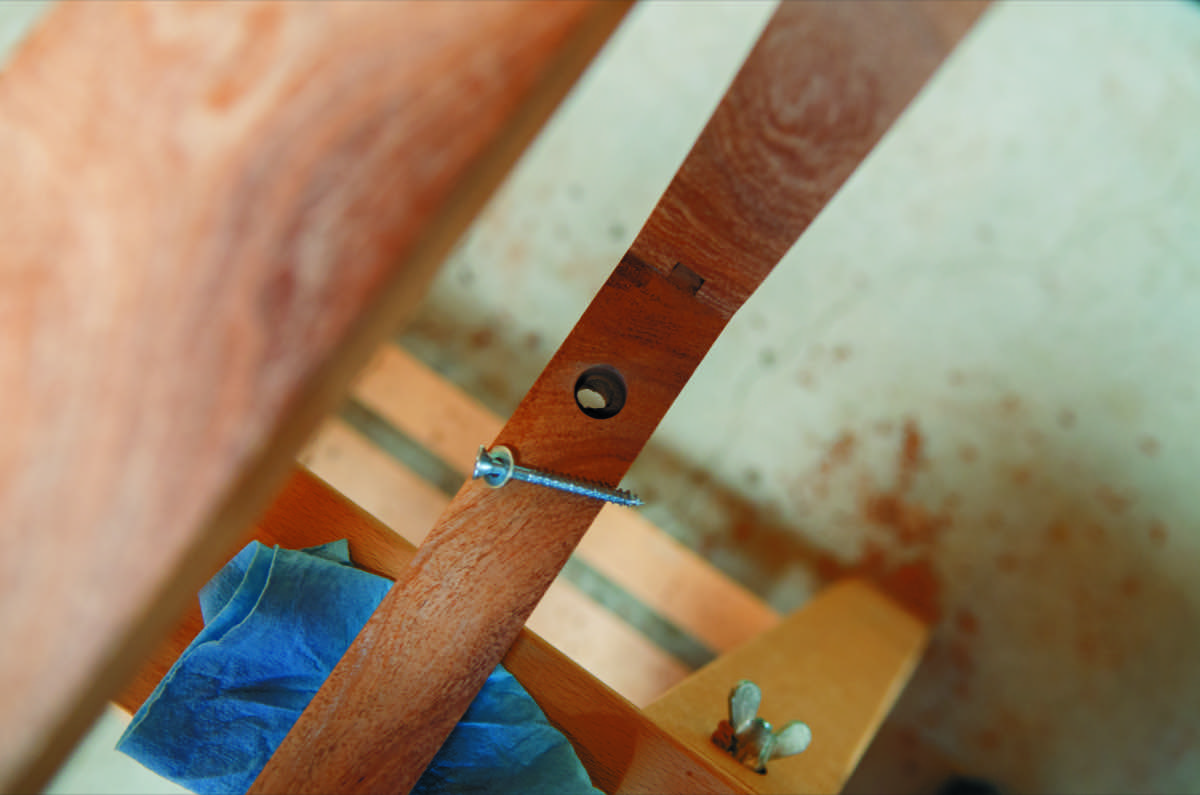
Step 12: Attach Table Top to Base
Last, but not least, attach the table top to the base using screws: one screw on each corner of the base. To allow for expansion and contraction that naturally occurs with every piece of wood, drill the holes in the base larger than the width of the screw. This will allow you to tighten the top down while allowing the small amount of side-to-side movement. It shouldn’t be able to be easily shifted side to side by pushing on it, but the massive amount of force behind wood movement will easily shift the screws when it’s needed.
Drill the holes in the base and then set the base upside down on the bottom of the tabletop, position in the proper place, and mark and drill pilot holes for each screw. Pilot holes should be smaller than the screw by a small margin, allowing the threads to dig into solid wood.
 Step 13: Put your feet up on a fine piece of furniture
Upon completion of your first piece of fine furniture, you will probably feel a unique mixture of relief and gratification. If you made any mistakes along the way (and let’s be honest—you did), you will always remember where they are, but at the same time feel a sense of pride for the work you did and for what it became. No one else will notice the mistakes, or if they do, they will be too polite to tell you. Doubtless, in a few days, you will start to feel the need to begin a new piece of furniture, so in the meantime, sit back and kick your feet up on your awesome new coffee table.
Thanks to Silas and David for sharing this awesome DIY mid-century coffee table with us, and to Quarry Books for connecting us. Pick up your copy of The Art and Craft of Wood today.


