Home Fitness: How to Make a DIY Plyometric Box
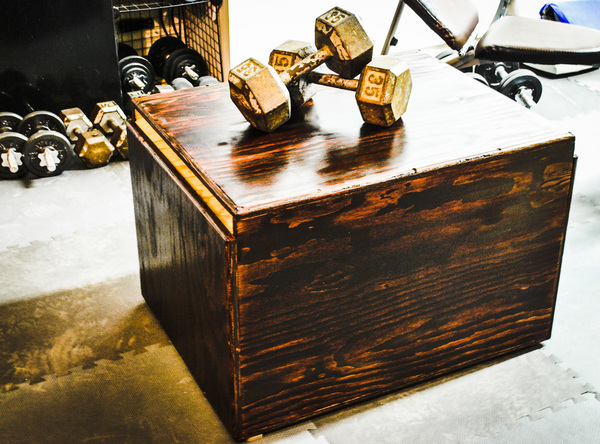 One of the most common items in the gym today is the simple plyometric box. These boxes are a fantastic way to get your workout on, and it’s easy to make them any size you need to push that workout to the next level. We do a lot of workouts at home. It’s just the way life works for a big family that the gym needs to be close so we took a space in our garage and turned it into our workout corner. I have a bench that I can use for many of my leg workouts, but adding a bit of height to my step-ups and box jumps required a bigger box. So, I set out to make a 3-in-1 box with that won’t take much space, but still is tall and stable enough to keep me challenged.
This project can be adapted to any size box, but the plans will be for a 20″, 24″, and 30″ box. This is on the very large side of boxes, for most, a 15″, 20″, 24″ will be fine, but I want something big to aspire to.
1. The Wood: The box is easier to handle, and looks better if you use a nice sanded plywood, but be sure not to make it too smooth where grip is an issue if it gets sweaty. For stability and durability, 3/4″ thickness is the minimum. Stay away from particle board or similar products because it just won’t hold up to the abuse.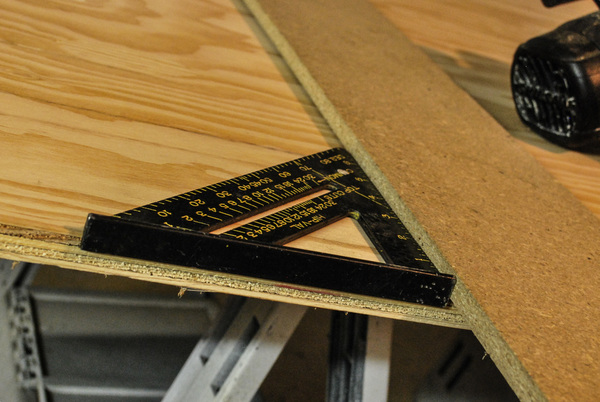
2. The Dimensions: The box needs to be wide enough to be stable on all sides, so a minimum of about 2/3 the height. This means on the 30″ side, the width of the bottom needs to be at least 20″.
Materials:
- Plywood, 1 sheet 3/4″
- 1 box 1.5″ wood screws
- Wood Glue
- Sandpaper
- Rub-On Polyurethane
Cut List:
(2) 24″ x 30″
(2) 20″ x 30″
(2) 18.5″ x 30″
Step 1 – Make the cuts – All pieces of this project come from a single sheet of plywood. It’s important to keep track of each piece, but there is plenty of room for everything to come out of one sheet. Make all cuts using a saw and straightedge.
Step 2 – Lay out the pieces – It’s important to keep track of the pieces as they look similar but only fit together one way. The sides and ends need to be nested right for it all to fit. Double check the pieces for size, then mark out for the screws.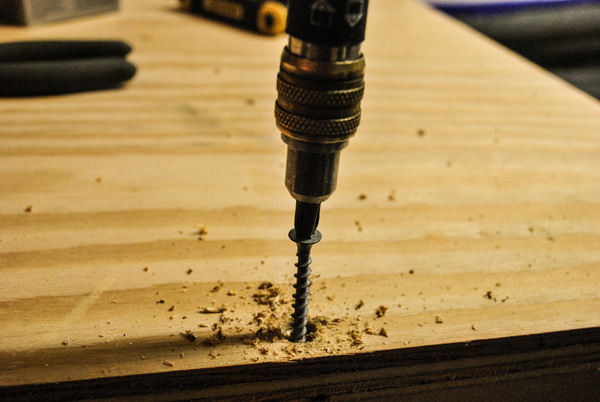
Step 3 – Countersink the screwholes – To make sure the screws fit flush to the surface and don’t pose a danger to catching shoes, all holes need to be countersunk. Use a countersink bit to prepare all the holes. If you want the box to look impressive, evenly space the holes by measuring with a yardstick.
Step 4 – Glue and screw the box together – Add a thin bead of glue along the edge, then clamp and screw the pieces together. Any glue squeeze-out can be cleaned up with a damp cloth.
Step 5 – Round over the edges – We’ve all been bit in the shin by that last box jump. rounding over the edges a bit will keep that pain and damage to a minimum. Using a roundover bit, carefully round all edges over. Be sure to avoid nicking any screws with the bit.
Step 6 – Finish and use – Use your finish of choice to make the box as dressed up as you want. I used a Dark Red Mahogony finish I had left over from another project that makes it look good, but isn’t slippery enough to pose a danger when the workout turns sweaty.
Now that I have a box, stay tuned for a few of my favorite workouts I plan on doing with my new home gym addition.


![How To Find a Good Mechanic [6 Signs To Look Out For]](https://www.manmadediy.com/wp-content/uploads/2026/05/pexels-cottonbro-4489721-25704-scaled-1-23155.jpg?width=300&height=160)