Woodworking Faux Pas: 6 Things You Should Never Do When Tackling a New Project
When you’re just getting started in the world of building things, you’ll find it can be rather hard to develop the “best practices” to help guide you down the right path. You’re busy trying to figure out what the difference between a bevel and a miter is, but what you really need is someone to say “do this, not that.”
 It wasn’t until I took a few classes and befriended some woodworkers that i really started to learn how to not do dumb things. Here’s a list of six things I wish I would have learned before I wasted money and time on early projects.

1. Using pressure treated pine indoors
It may be a cheap building option, but PT pine is treated with chemicals that, if ingested, are harmful to you, your children and your pets. If the FDA doesn’t approve it for food contact, I wouldn’t recommend it to be used in furniture inside your home. It also stays wet, and can be hard to finish or paint. If you are trying to save money, use kiln-dried or furniture-grade pine.

2. Thinking you don’t need to measure twice and cut once.
This rule applies to everyone. Take my word for it: Don’t cut into expensive materials without double-checking your measurements. Ruining an expensive piece of tropical hardwood will make you wish you would have heeded that advice. Measure twice, heck, measure three times.

3. Using stain and polyurethane in one.
There’s no substitute for applying stain and poly separately. Stain needs to be applied with care and attention to detail. Poly needs to be applied in several coats, including in-between sandings. When you put the two together you make it harder on yourself when you mess up. The more coats you do of the poly/stain, the more murky layers you cake on top of your wood project, and the more buried the wood grain gets.
4. Maverick drilling
The quickest way to ruin a project is to avoid drilling pilot holes. Skipping that one easy step will assure that the screws will split and crack the wood or the screw heads will get stripped. Don’t get cocky and think the screw will be ok without it. It won’t. If you want your screws to go in even smoother, roll them on a bar of soap or beeswax. This reduces friction and will guarantee a quicker, smoother grip.
5. Disobeying the order of the sandpaper
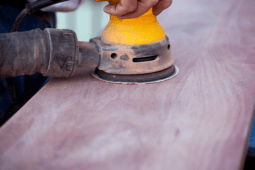
Sandpaper is ordered by grits. The higher the number, the smoother the paper becomes. After you’ve determined what grit you need to remove or smooth material on your project, you must work you way up the scale. The idea is that each level of paper blends into the previous one. If you start with an 80 grit and skip to a 400 grit, you’re going to have a hard time getting those deep scuffs out.

6. Going against the grain
That cliche phrase is so over used I think we may have forgotten why we say it. Paying attention to the direction of the grain can help you when it comes to cutting and sanding any kind of wood. Think of it like petting a cat from the back to the front–it’s a great way to get scratched. Going against the grain may get you a promotion at work, but when you sand, plane or scrape against the grain it can pull up fibers and make your task a heck of a lot harder. This same principle applies to rip cutting a board. It can make a difference in whether or not your wood splinters and tears out as it is cut. Check out this article from American Woodworker for more information.
The general theme here is to not cut corners. Take your time with your projects and be wary of “quick and easy” DIY plans that tell you how to avoid important steps to finish quicker. If you take your time and focus you’ll have results and less money in your swear jar!

