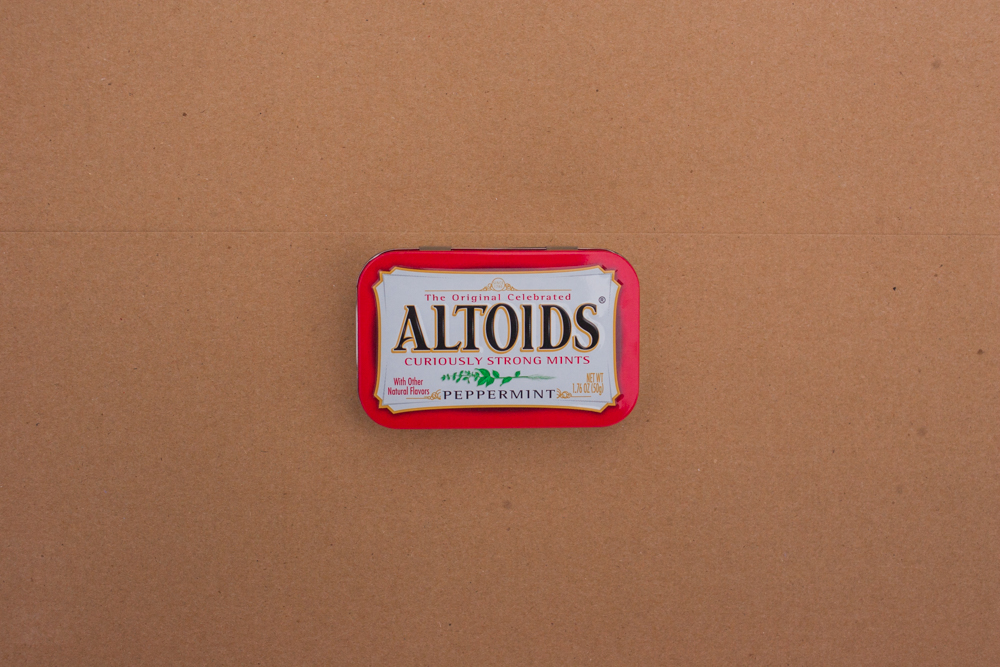
How to Build Your Own Altoids Tin Survival Kit
I’m sure the original makers of Altoids had no concept of survivalism, let alone having any inkling that they were providing a vessel for emergency lifesaving tools. Yet here we are: this humble, yet curiously strong, breath mint has inspired scores of tutorials for intrepid would-be wilderness warriors.
Rather than reinventing the wheel, we at ManMadDIY have scoured the tutorials, and we’ve honed in on what we think are the best basics for that quintessential Internet favorite, the Altoids tin survival kit.
Let’s dig in!
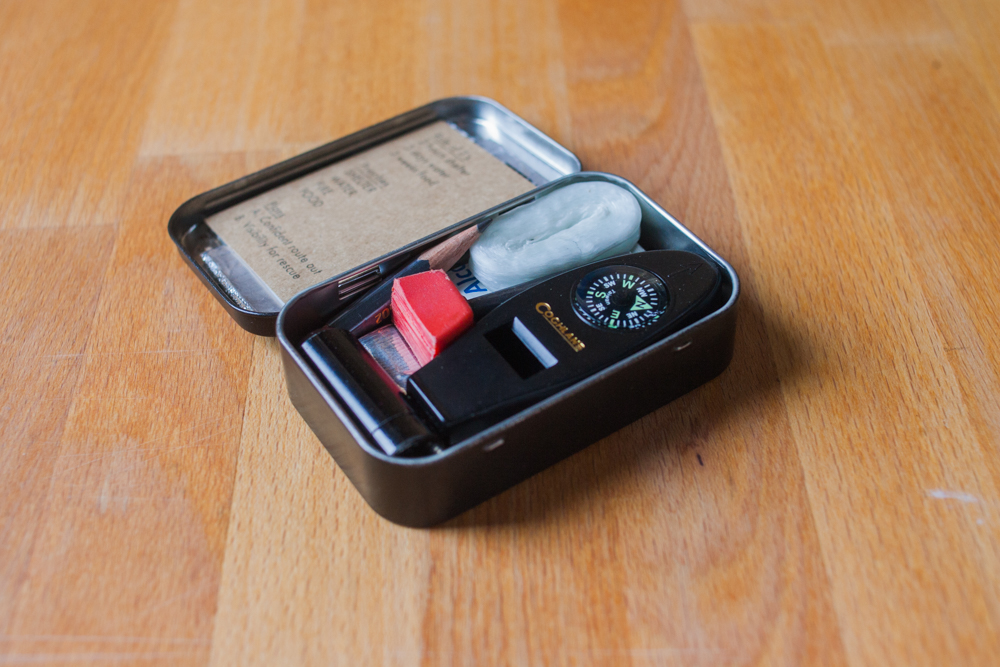
The Kit Contents:
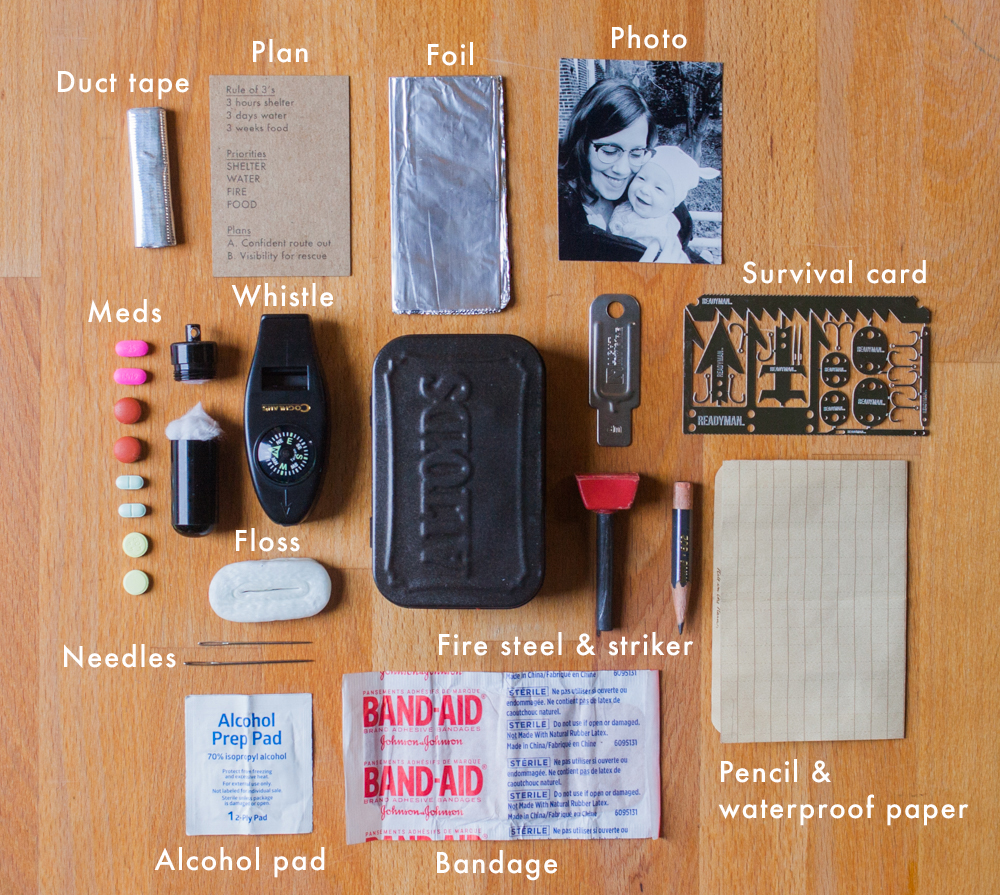
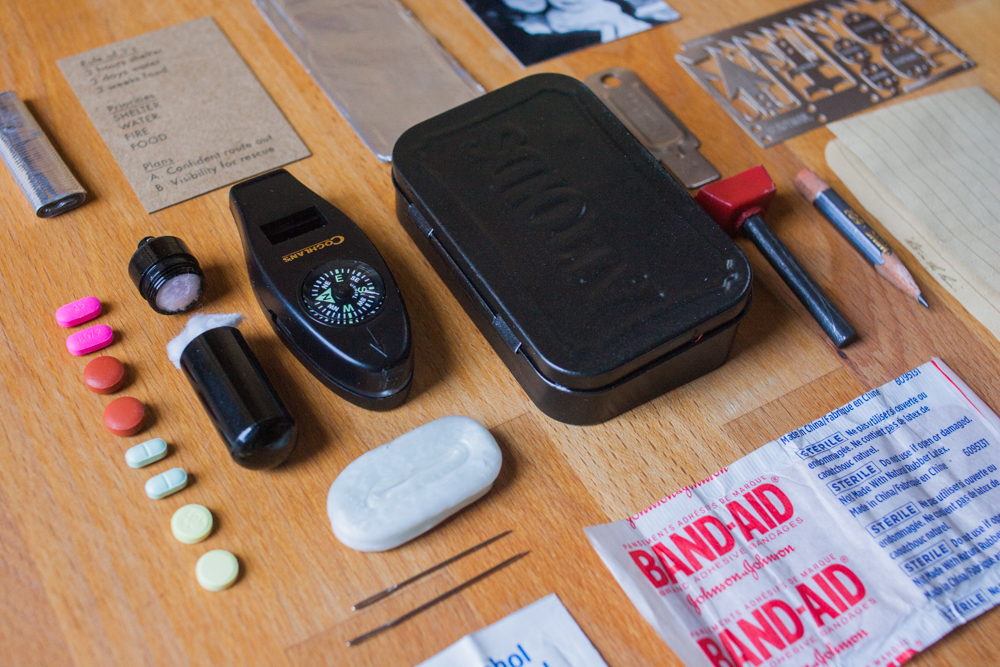
1. Wilderness Survival Card
This is a cool little tool designed by former Special Forces guys with various punch-out tools. It’s paper-light and lays flat at the bottom of the tin. (The 2.0 version perfectly matches the tin’s footprint; mine’s an older version, which is slightly too big, so I snipped the corners to make it fit.)
Shop around and see which one works best for you. The Wilderness model includes needles, tweezers, an awl, a trident for gigging in streams, arrowheads, small saws, and plenty of fishhooks.
I’ve not personally tested mine yet because I want to keep it intact, though I’d like to buy a couple more to practice with. In the meantime, there are plenty of YouTube videos of successful field tests, so I trust it’ll work in a pinch.
2. Meds
A handful of pills are super helpful in an emergency:
- Ibuprofen reduces a fever, but also helps keep up morale if you’re trying to plan with a bad headache.
- Imodium and Dramamine helps prevent dehydration from diarrhea and vomiting, respectively, especially when brought on by ingesting stuff your body isn’t accustomed to.
- Benadryl helps prevent potentially dangerous allergic reactions. (On a trip out west a while ago, I had such an unexpectedly bad allergic reaction to sagebrush that I nearly needed to go to a hospital, but we were in the absolute middle of nowhere, so I had to wait for a gas station before being able to pop a couple of Benadryl.)
- Packing the pills with a shredded-up cotton ball provides fire tinder in case you’re struggling to improvise it. The pill bottle I used has a rubber o-ring that keeps it waterproof as well.
3. Minimal First aid
- 1 large Band-aid
- 1 alcohol prep swab
This is admittedly very minimal, but it assumes more of an everyday use than for extreme survival. (For injuries beyond a 1.5″ x 2″ Band-Aid, improvisation will be necessary.) But it’s better than nothing!
4. Emergency whistle
Remember 3×3 for the international distress call: 3 whistle blasts, 3 seconds each. Whistles are great for rescue situations because you can use them even when you’ve lost your voice, and they cut over wind and through debris.
This whistle came with button compass and a magnifying glass for lighting tinder in sunny weather. The compass isn’t going to be as accurate as a nice orienteering compass, but it’s nice to have if you need to navigate and have a sense of where you need to go.
To save space, I removed the thermometer gauge from the back and cut off the plastic keyring loop on the end with a hacksaw.
5. Waxed dental floss (150 ft.)
Floss is such a great tool that it deserves its own post. It’s really strong—while researching for this article I found YouTube clips of a guy fishing for shad using floss in his reel—and it’s versatile. You can use it for anything from sewing up clothing, to securing gear, to fishing or setting traps.
I chose waxed floss instead of fishing line as a multipurpose string because it’s way less slippery, and therefore way easier to use. (I also didn’t want my kit smelling like stale peppermint after a while, so I made sure to buy unflavored floss.) To fit it in the kit, I popped it out of the case, took out the plastic ring in the center, and squeezed it to fit.
6. Sewing needles with large eye holes (2)
Perfect for clothing repairs, and good for everyday use so I don’t have to bust out the needles from my Readyman card. Large eye holes are easier to thread with the floss.
7. Duct tape, reflective finish (1 foot)
Like floss, duct tape is extremely versatile. It’s especially great for repairs and waterproofing. I chose a reflective metallic finish to double for signaling, either folded flat like a mirror or along a trail. I rolled it thin so it would fit between some of the larger items in the kit.
8. Writing materials
The ability to write in an emergency is actually pretty important. When you’re really stressed out, it’s hard to think clearly, so writing can help you focus—whether it’s figuring out a plan to stay safe while waiting for rescue, or retracing your steps back to the trail. Recording thoughts is also good for morale. (There’s a reason why tally marks on the prison wall is a trope in fiction.)
• Small section of pencil: can be used as-is, or elongated by tying it to a stick with the floss. I used a leftover bit of Blackwing 602 because A) it’s an awesome pencil, 2) it fits the silver color scheme—hey, I’m a graphic designer by trade! and D) it’s a slightly softer pencil, so it doesn’t require a super hard writing surface.
• For extra-durable paper, I tore out a sheet from one of my Rite in the Rain waterproof notepads.
9. Fire steel with striker
Fire is an extremely important survival priority. Heck, it’s a priority even when you’re car camping. A lot of survival kits I’ve seen include a small lighter or waterproof matches, but lighters can break, matches run out quickly, and both require decent weather to operate. The fire steel is superior in all respects: it sparks in the wet and the wind, and it’s marketed as providing thousands of strikes.
I’ve got a first-generation Swedish Fire Steel in my kit and used a hacksaw to cut off all but a half-inch of the handle to make it more compact.
10. Heavy-duty aluminum foil (1 sq. foot)
Foil is another versatile survival tool that’s cheap and easy to include. It packs really flat (I used a bone folder to take out the creases) and is especially helpful in applications of heat: for example, it can be used as a makeshift water vessel, or as a base to start a fire when the ground is wet. It also doubles as a signal.
I chose heavy-duty foil because it’s a lot more sturdy and less liable to tear than the cheaper stuff.
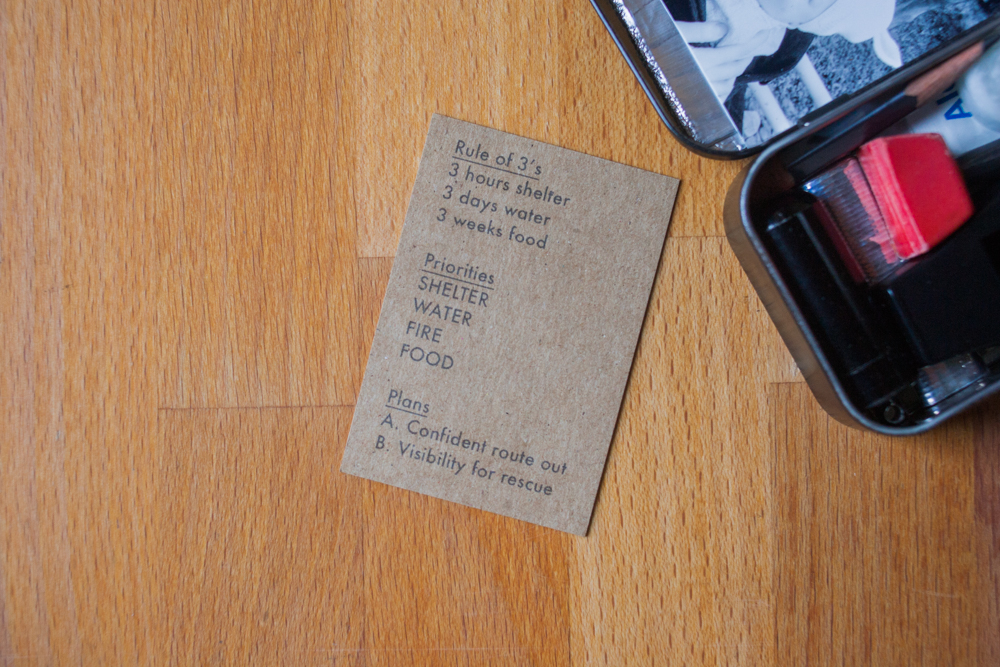
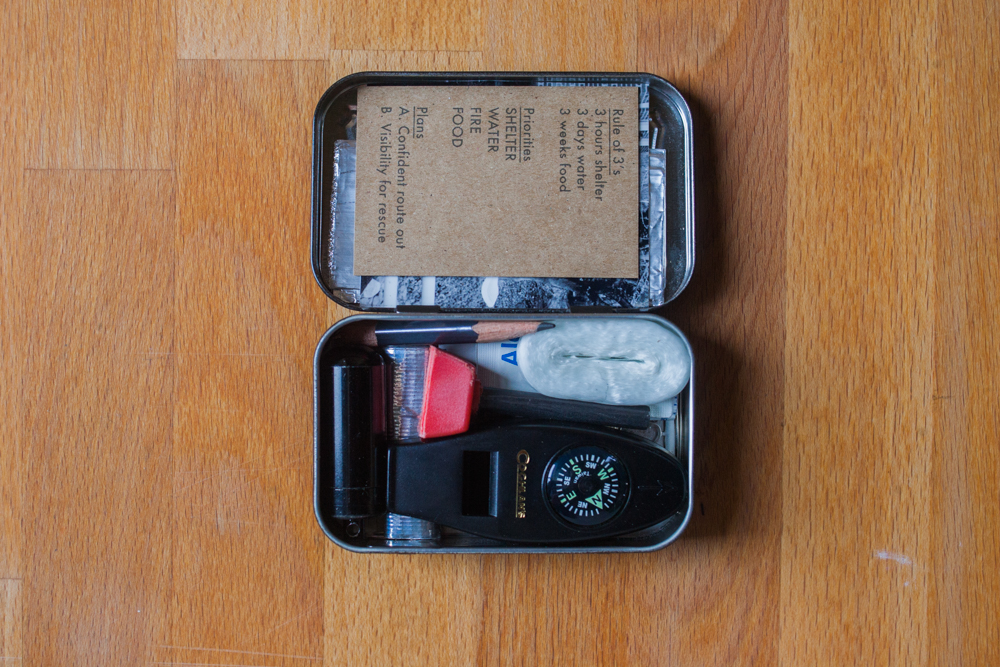
11. Gameplan
One of your greatest assets is planning ahead. I don’t trust how clearly I’ll be thinking in an emergency, so I included a couple of rules of thumb on both sides of a 2″ x 3″ piece of card stock. I plan to swap this out with more specific information depending on where I’m headed.
The point is, have some kind of game plan in place—bonus points if you can distill into something as easy to remember as Stop, Drop, and Roll.
Also, extra bonus points for using a cool typeface. (Futura has never really gone out of style since it was created in the ’30s.)
12. Photo (AKA reason for living)
If I ever get myself into a situation where my life depends on my will to survive, I’m choosing to live for my wife and daughter. Including their picture is an extra incentive to get me through it. (Not to mention, I happen to think they’re nice to look at every time I open my kit.)
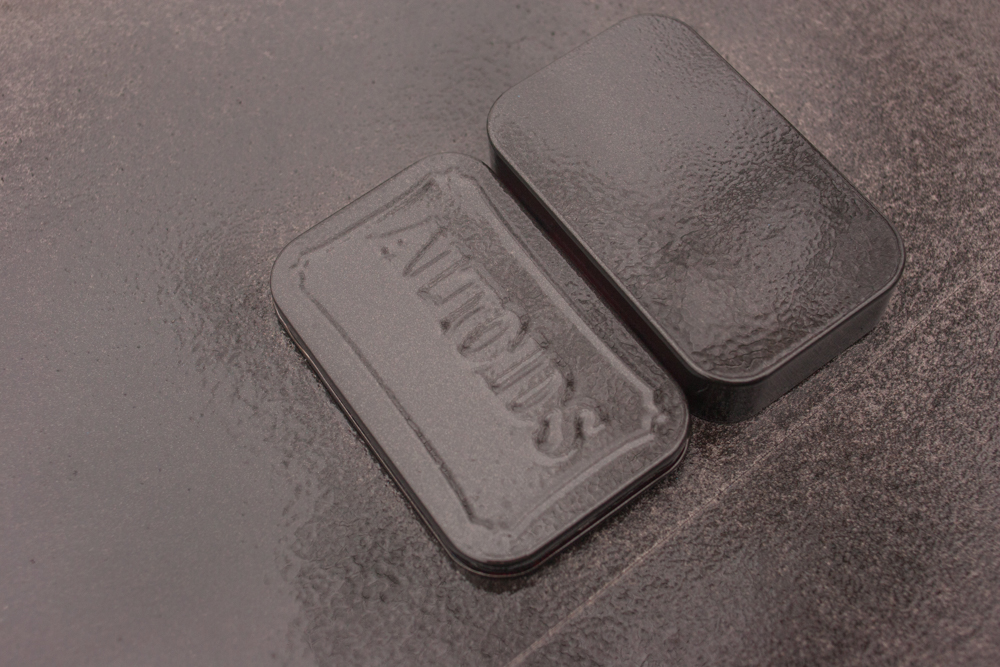
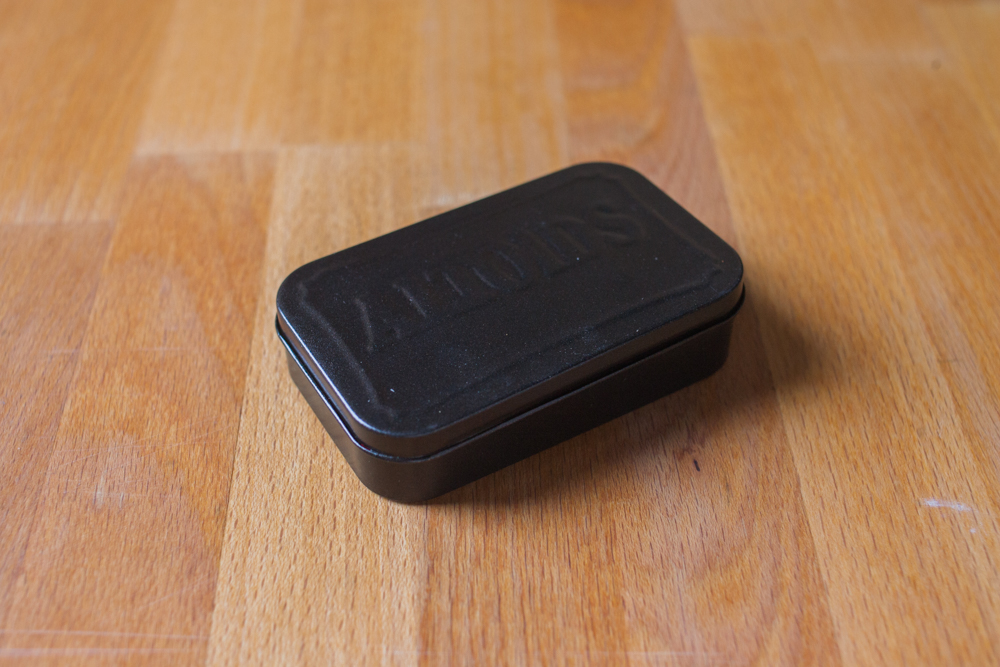
13. Altoids tin
The tin itself is a survival tool! You can use the reflective inside to signal would-be rescuers. You can also use it as a container to make char cloth for firestarters. I’ve spray painted mine using “oil-rubbed bronze” from Rust-Oleum because, well, it just looks cool.

The Kit Design Principles:
Of all the things I chose to include in the kit, I also left a lot out. Here are some principles I used in designing this kit, which may help you when you’re sifting through items to make yours:
Balance
I’ve mentioned survival a lot, and “lost in the woods” was the dominant mental picture when I packed this kit and wrote this post, so each item was primarily designed to be used in a wilderness emergency situation. But I don’t need more dust collectors, so the last thing I wanted to do was put something together that I couldn’t also use in my everyday life.
This kit attempts to fulfill those everyday needs as well as the extreme ones: floss and needle for quick clothing repair, over-the-counter meds for inconvenience, duct tape for hold-it-together-for-now fixes, pencil and paper in case I needed to make a quick note. (Even the whistle would be helpful in an emergency.) I plan to use this stuff whenever I need it, even when I’m out at the library, and replace what gets used.
This is also the reason I chose not to include things like water purification tablets; it would be great in a pinch, sure, but 1) odds are good I’m not going to need them before they expire, and 2) I can reliably purify water using other methods, which means 3) I’m not wasting the 8 bucks required to buy it.
Finally, I would probably adjust the kit slightly for radically different contexts, like desert or city; but generally speaking, these tools are better than nothing, no matter the context.
Priorities: the Rule of 3s and the Core 4
According to the US Forest Service, in case you ever find yourself lost in the woods and aren’t confident about how to get out, the best course of action is to stay put and aid in your own rescue by making your presence more visible. So if you take a moment to calm down, orient yourself, and you really have no idea where the trail is, you need to shift your mindset from “get out of here now” to “get comfortable here now.”
This is where it’s helpful to stake out your limits by remembering survival Rule of 3’s, which states that you can survive…
- 3 hours without shelter (i.e. it’s dangerous to be too cold or too hot)
- 3 days without water
- 3 weeks without food
That means your Four Core priorities are, in order: shelter, water, fire, and food. You don’t know if you’re going to be stuck 24 hours or 24 days, so it’s time to set up an improvised camp, find a water source, and make a fire.
The tools in this kit were geared primarily toward these 4 core priorities. You’ve got several ways of making a fire for warmth and water purification, and ways of cutting branches to make a lean-to. In addition, you’ve got ways of making yourself visible to rescuers.
Note: it’s probably time to study up on some bushcraft skills if you get lost in the woods and truly don’t want to up the proverbial creek without a paddle.
Irreplaceability and multifunction
Since size is really at a premium with a kit this small, each item has to pull maximum load. Having multiple functions is key. If it can be improvised, I left it out—for example, a water vessel like a ziploc bag was a nice idea, but it took up a lot of space; a better alternative is a rainproof jacket or even the heavy-duty foil reinforced with duct tape.
I also didn’t want to pack the thing so full that it would be a pain in the butt to open up, so I had to keep my choices minimal.
Ultimate function
As a designer, I’m a firm believer in the maxim made famous by the design group Bahaus: form follows function.
In survival circles, this kit is often affectionately known as a BOAT (Bug-Out Altoids Tin), and much like a real lifeboat, it isn’t intended for heavy-duty use… but can fill in if it has to. (After all, no one intends to cross the ocean in a raft, but it’s well documented to have been done quite a few times!) The purpose of this kit is to supplement your normal EDC. Remember the preparedness adage: two is one, and one is none.
Hence, the most glaring useful item I left out from the kit: a knife.
Simply put, I didn’t include a knife because I’m assuming that if you’re going to take the trouble to assemble an emergency kit, you’re going to be the kind of person who always carries a knife. (Unless you live in an area with strict knife laws, of course.)
Keeping the knife out of the kit also allows you to choose the EDC knife to fit the situation: a nice bushcraft knife for hiking, a multitool or pocketknife for running around town.
Finally, one more caveat:
This tutorial is intended as a set of guidelines to get you started, NOT a for-all-time set of rules. Beware of anyone saying their way is the best, because the best way is the one custom-tailored for you and your needs! Your kit will look different based on factors like geography (a desert kit will have different needs from a forest kit), access to amenities (an urban kit vs. a wilderness kit), and personal needs (meds, for example).


