Stop Ruining Your Kitchen Knives: The Right Way to Use a Whetstone

If your knife slips on a tomato instead of slicing clean through it, it’s not just annoying—it’s a safety hazard. A dull knife requires more force, which significantly reduces your control over the blade. Most home cooks assume their knives are “just old,” but in reality, they are simply improperly maintained.
Learning how to sharpen kitchen knives at home is a fundamental DIY skill that saves money and prevents kitchen accidents. This guide will walk you through the physics of the blade and the specific techniques required to restore a razor-sharp edge.
1. Understanding the Difference: Honing vs. Sharpening

Before you start, you must understand that the long metal rod in your knife block is not a sharpener—it is a honing rod.
- Honing: Think of this as “maintenance.” Over time, the microscopic “teeth” of your knife edge bend to the side. Honing realigns these teeth without removing any metal.
- Sharpening: This is “repair.” Sharpening actually grinds away a small amount of metal to create a brand-new, V-shaped edge.
The Rule: Hone your knife every time you use it; sharpen it only when the edge is truly degraded.
2. The Expert Choice: The Whetstone Method

While pull-through gadgets are convenient, whetstones offer the highest level of precision and longevity for your cutlery. You’ll want a double-sided stone: a 1000-grit side for sharpening and a 6000-grit side for polishing.
Tools Needed:
- Whetstone: A 1000/6000 grit combo.
- Stone Holder: A damp towel or rubber base to prevent slipping.
- Water: To lubricate the stone and flush out “swarf” (metal filings).
3. Step-by-Step: Restoring the Edge

Step 1: Submerge and Saturate
Soak your whetstone in water for at least 10–15 minutes. Why? Water acts as a lubricant and a coolant. Without it, the friction creates heat that can actually ruin the “temper” (the hardness) of your steel, making the blade brittle.
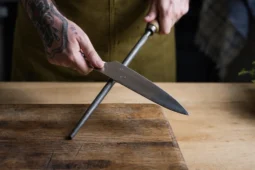
Step 2: Set Your Angle
Most Western knives require a 20-degree angle, while Japanese knives are often thinner, at 15 degrees.
- Pro Tip: If you can’t visualize the angle, stack two quarters on the stone and rest your knife spine on top of them. That height represents roughly a 20-degree angle.
Step 3: Find the “Burr”
This is the most critical step that beginners miss. As you stroke the knife across the stone, you are folding a microscopic amount of metal over the edge. This is called a burr.
- Apply light pressure and stroke the blade from heel to tip.
- Once you can feel a slight “roughness” along the entire opposite side of the blade, you have successfully reached the center of the steel. Now, flip the knife and repeat.
Step 4: Refine on the Fine Grit
Flip to the 6000-grit side. Use very light strokes to “strop” the blade. This removes the burr you just created and polishes the edge to a mirror finish.
4. Common Sharpening Mistakes to Avoid
- Changing the Angle: If your angle wobbles mid-stroke, you will round over the edge instead of sharpening it. Consistency is more important than speed.
- Using Too Much Pressure: Let the grit of the stone do the work. Pressing too hard can warp the blade or cause the stone to gouge.
- The “Paper Test” Fail: Don’t assume it’s sharp. If the knife catches or tears a piece of printer paper instead of slicing through it like butter, you need more time on the coarse grit.
5. Maintenance Schedule

To keep your knives in peak condition, follow this professional timeline:
- Hone: Weekly (or before every major meal prep).
- Sharpen: Every 3–4 months for daily home cooks.
Wash: Never put a sharp knife in the dishwasher. The high heat and rattling can chip the edge and dull the steel instantly.