IKEA Hack: How to Make a Noguchi-Inspired Mid-Century Modern Lamp

Isamu Noguchi’s Akari lamps are among the classic, iconic pieces of mid-century design. These practical light sculptures are a playful take on the traditional Japanese paper lantern; updated with legs that echo the emerging atomic culture of the early 1950s, yet still maintaining the biomorphic shape found in Noguchi’s other works. The Akari lamp series has been a part of the MoMA’s permanent collection almost as long as it’s been around.
IKEA has featured their share of paper lantern-inspired lamps over the years. The most recent rendition is the VÄTE series, a collection of rice paper shades on steel frames that give an obvious nod to Noguchi. Thankfully, the 9.99 table lamp is perfect fodder to recreate an Akari-alike Beehive lamp. It takes less than an hour, and uses less than $15.00 in materials, lamp included.
Tools and Materials
- IKEA VÄTE table lamp
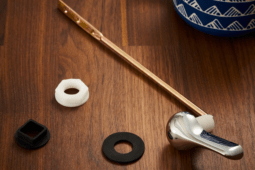
- Rigid, but flexible picture-hanging wire; in the hardware aisle of the home center
- Wire cutting pliers or tin-snips
- 5/16″ brass tube; found at a hobby shop, also available in art centers and some craft stores
- Hacksaw, Dremel, grinder, or some means of cutting metal
- Electric drill and 5/16″ bit
- 1/2″ wooden spheres; craft store, in unfinished wood aisle
- Two-part metal expoxy, such as JB Weld
- Black spray paint (spray primer also recommended)

1. Changing the Shape. The first challenge is to change the shape of the IKEA lamp to be less symmetrical, and more organic and orb-ish. I also wanted to get rid of the little nub at the top of the lamp. The shade is collapsible (flat-pack and all that) and is supported by the steel structure pictured above. Since its designed to fit the lamp perfectly, including structuring the nub, there’s no way to just configure the support to hold up the lamp at a different angle. So, the trick here is to make a shorter support that will allow the shade to sit at a different angle. To do it, separate the steel support from the lamp base, and cut the top off. Then, trim off 2 1/2″ of the length, and reattach the top shape with tape. Cut an 20-24″ piece of picture hanging wire, and use the original support as a guide to make a new one. I started about half way up the left side, so the joint wasn’t in a crucial place. Once the shape was completed, I twisted the two raw ends together, and secured it with a bit of packing tape. The results looked like this:

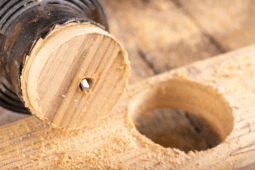
2. Creating the legs. The IKEA lamp comes with three tiny prongs on the base, which make it super easy to extend into the spaceship-y looking legs. To make some, cut three sections of 5/16″ brass tube to a third of the height of the lamp, 3″. Then, drill a 5/16″ hole 3/8″ deep into the wooden spheres. Use the epoxy to secure the spheres to the legs.

3. Make a little half-loop out of 3″ of the picture hanging wire, bending it around a pipe or broom handle. This will mimic the hook on top of the Beehive lamp, that echoes the hanging hardware of the original Japanese paper lamps (I presume). Take the loop and glued leg/feet combos outside and spray paint. A coat of spray primer first is recommended.

4. The tiny feet that come on the lamp are at a bit of a stronger angle than make sense for the longer legs…which would extend beyond the width of the lamp. Thankfully, they’re easy enough to bend in to accommodate the new legs. Remove the little rubber cover, and then place the leg in a vice, strong clamp, or pliers. Bend the lamp down, to change the angle from the original 45-degrees to about 30-degrees. The specific angle doesn’t matter, as long as they’re consistent.
5. To assemble everything, place the bulb in the lamp, and attach your handmade support. Stretch the top over the support – don’t extend the little nub, just leave it folded and compact. Wedge the support under one of the ribs of the shade, making a shape that pleases you. Use a little white glue to secure the excess shade, if you want. Insert the half-loop into the hole, using pressure to secure it. It doesn’t serve any function, just mimics the original.
Lastly, mix up some expoxy, and glue your legs to the little feet.
Flip it on and enjoy! You just saved 85%, and you did it yourself.