How to Remove Drywall Anchors [4 Easy Methods]
Drywall anchors can come in handy for a lot of things. If you want to have something safely on a hollow wall, you can do so without having to hit a stud. You can also hang something heavy without the worry of it tumbling down.
But when it comes time to remove those drywall anchors, you may be presented with how to get them out. Sometimes they remove simply, other times it takes a little more work. You can pull it out, back it out, cut it and hammer it, and more. It really depends on your comfort level as well as the stubbornness of the anchor.
Why Use Drywall Anchors?
One of the selling points of drywall versus other wall materials is that they offer versatility. You can hang just about anything you want on the wall so long as you are using the proper nails or screws. And to ensure that the screws sit in even the shallowest of drywall, you need to use anchors.

In some cases, you can mount your object to a wall stud. But wall studs are sometimes difficult to find and may not be in a spot where you want to mount. So, what can you do? With drywall anchors, you can mount your object anywhere on the wall.
The anchor does just that: it anchors itself into the drywall to create a more secure seat for the screw. If you just screw into the wall without the anchor, you run the risk of the object being too heavy, pulling the screw out of the wall and tumbling to the floor.
4 Ways To Remove Drywall Anchors
Thankfully, there are more than a few methods for getting a stuck anchor out of the wall. You may get lucky and have the anchor pull out of the wall when you unscrew the screw, but that is not likely to happen.
Use these steps to get even the most stuck of drywall anchors out of your wall. All you have to do after that is cover the hole with a little bit of spackle.
The Tools of the Trade
Before you can begin, you need to get the right tools for the job. Tools and equipment to remove a drywall anchor include:
- Electric drill
- Hammer
- Screwdriver
- Needle-nose pliers
- Protective goggles
The more tools you have available to do the job, the more convenient a time you will have. The last thing you want to do is have to get up onto a step-stool or ladder only to have to climb right down to get another tool.
Method 1: Pull it Out
For this step, you would need your trusty needle-nose pliers. All you do is grab the head or collar of the anchor firmly using your pliers. Just rock gently back-and-forth, wiggling the anchor as you move it back and forth.
For the most part, this should be enough to bring the anchor out of the wall. But if it remains secure, don’t force the issue. By continuously forcing the anchor, you run the risk of doing damage to the wall, creating a larger hole than where the anchor sits. You would then want to move onto the next step.
Method 2: Back it Out
If you tried wiggling the anchor out to no avail, this next method is one of the most commonly implemented for anchor removal. Grab a screwdriver that will snuggly fit inside the mouth of the anchor. When you have it in place, you can tap the screwdriver head further into the anchor using a hammer.

When the screwdriver is secured properly into place, twist it counter-clockwise. You should be able to back the anchor out slowly but surely at this point. The anchor should eventually pull completely free of the wall.
If the anchor turns but won’t back out, or it won’t budget at all, then you will have to implement further measures to get it out. Like the method above, you don’t want to force the issue. It could create a larger hole in the wall, facilitating a greater repair effort.
Method 3: Cutting and Hammering
By now, you are getting to the more drastic measures for removing an anchor from drywall. But that does not mean that you are at the end of the road. Grab your protective goggles before you start this next step as there will no doubt be drywall dust in the air.
Grab a 1-inch cutting wheel and attach it to your cordless drill. From here, you will have to cut the head or top off of the anchor. Do so carefully so as to not put a gauge or divot in the drywall; you will have to repair that if you do.
Tape a wide nail into the mouth of the anchor. Use your hammer to tap it in until the anchor falls back into the wall. From there, you can use a utility knife if you don’t have a cutting wheel to score the drywall around the anchor head.
Finally, get a flathead screwdriver that has a head wider than the anchor mouth but not wider than the anchor itself. Tape the screwdriver until the anchor falls out from behind the back of the wall.
Method 4: Recess It
If you have multiple drywall anchors to deal with, the simplest way may be to recess them. You may also want to consider this option if the drywall is either water damaged or brittle as removing them can be difficult.
Simply score the drywall around the head of the anchor using your utility knife. Then, take a screwdriver that has a wider head than the anchor mouth directly over the anchor head. Tap lightly but make sure that you are square to the head. You should sink the anchor at least partway into the wall.
When it is below the surface of the drywall, you can simply use joint compound to patch over the recessed anchor. Continue reading to learn how to patch over a recessed drywall anchor.
How To Patch Up Holes Left By Drywall Anchors
After removing the drywall anchor, the hole left behind can be unsightly. Thankfully, it’s fairly easy to fix. This method can also be used if you decide to patch over a recessed drywall anchor. The difference here is that the anchor still sits inside of the wall whereas it would be removed in other scenarios.
In both circumstances, patching is easy. All that you need to do is grab some drywall compound as you normally would and perform the patch job.
Step 1: Flatten the Edges
The first thing that needs to be done when patching recessed drywall anchors is to flatten the edges around the hole. All you need to get this part done is a hammer and a little bit of care. You don’t want to make the hole bigger or your workload any heavier.
Just take your hammer and tap lightly around the edges of the hole. You should see them start to conform until they are flat and flush with the wall itself. Just make sure that you clear away any drywall dust that may be leftover so that your drywall compound adheres properly.
Step 2: Apply the Drywall Compound
When you are certain that the edges of the hole are flush with the wall and clean from drywall dust, it is time to apply your drywall compound. There are some drywall compounds that go on in different colors and dry white so that you can see where you have applied it and also know when it’s ready to paint.
Apply just enough that you can fill the hole, moving in an “X” pattern over the spot that requires repairing. You should have a putty knife to perform this task so that you can distribute the compound evenly over the hole.
Make sure that you clear away any excess drywall compound in the process. Depending on the instructions, you may have to let it sit overnight to dry. Just make sure to check the back of the label and give the compound the proper time to dry.
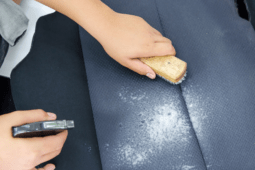
Step 3: Sand
After allowing the drywall compound to properly dry, it is time to sand the dried compound. Use a medium-grit sandpaper to do the job. After all, you don’t want to sand away all of the compound and find yourself in need of a re-application.

Sand the spot until it is smooth to the touch and as flush with the wall as possible. It may take a little bit of time to get comfortable with how to sand these spots so that you create an even covering. You may also find that you did not cover properly the first time around and require a re-application.

When you have finished sanding the holes, all that is left is to clean up and paint. Use a damp dust cloth to remove the drywall dust that collects in the area in which you sanded. You can then touch up those spots using a paint color of the same hue as your wall. The latter part can be tricky if you don’t have the paint that was used. You might find that your paint doesn’t match, leaving off-color spots on your wall.